Manage Plans
✑ From the OSIS sidebar, Click on the Manage Plans link under Program Management.

From the top right of the Manage plans page, there are two (2) buttons, Add Program Plan and Find Program Plan.

✑ Click the Add Program Plan button to add a plan to OSIS. The Add Program Plan modal comes with three(3) different steps as following:

A. Define Plan(Step 1):
This step has the following fields:
- Program of Study: Search and click on the program for which the plan is for.
- Name: Add a name you can easily identify your plan with
- Minimum Credits For Program Completion: Input the total minimum credit required for the program completion.
✑ Click on the Continue button for the next step.
✑ Click on Cancel to stop the process.
B. Add Levels(Step 2):

✑ On the top right of this modal view, click on Add Level To Plan button which displays a popup with the following input fields:

- Level: This is a dropdown of levels for users to select. Eg. 100
- Period: This is a dropdown of all periods in a semester/trimester.
- Min. Credits: Enter the number of minimum credits for the plan.
- Max. Credits: Enter the number of maximum credits for the plan.
✑ Click on the Save button to confirm actions.
☛ Users can repeat the above process to add multiple levels plans.

✑ Click on Back to stop the process.
✑ Click on the Continue button for the next step.
✑ Click on Cancel to stop the process.
C. Add Courses(Final Step):

✑ To enable the Add Courses button. First, select the level from the dropdown above the Plan level Courses field.

✑ Click on the Add Courses button after selecting the level to add a course. The Add Courses modal comes with the following;

- Unit: This is a dropdown list showing all units(Faculty/departments) available in OSIS. It is populated from Manage Units.
- Level: This is a list of all levels available for the user to select. It is populated from
- Course: This dropdown populates after selecting the department in which the course is found. This is a dropdown list showing all departments added to OSIS. It is populated from Manage Courses.
- Course Type: Select from the dropdown list if the type is CORE or Elective.
- Program Option: this dropdown list shows Major and Minor Courses created. This is a dropdown list showing all departments available in OSIS. It is populated from Manage Programs. Select any if needed.
✑ Click on the Save button to confirm actions.
☛ Users can repeat the above process to add multiple courses to plans.

✑ Click on the Continue button to proceed to the next step.
Assign the plan to a batch of students
Search with the DOC month and year to get the count of students who will be assigned to the plan.

✑ Click on the Get Count button to get the number of students upon assigning the plan.
✑ To search for a particular Plan, Click on Find Program Plan button and fill in the details for that plan by:

- Progam
- DOC
- Min. Credit.
✑ Click on Find Plans button to confirm your actions,
✑ Click on Clear to clear all fields,
✑ Click on Close to close the modal.
☛ Find Program Plan fields are optional. Fill in as many as can help in narrowing down and click the Find Plans button. Clicking the Find Plans button with no entries will show all existing Program Plans.
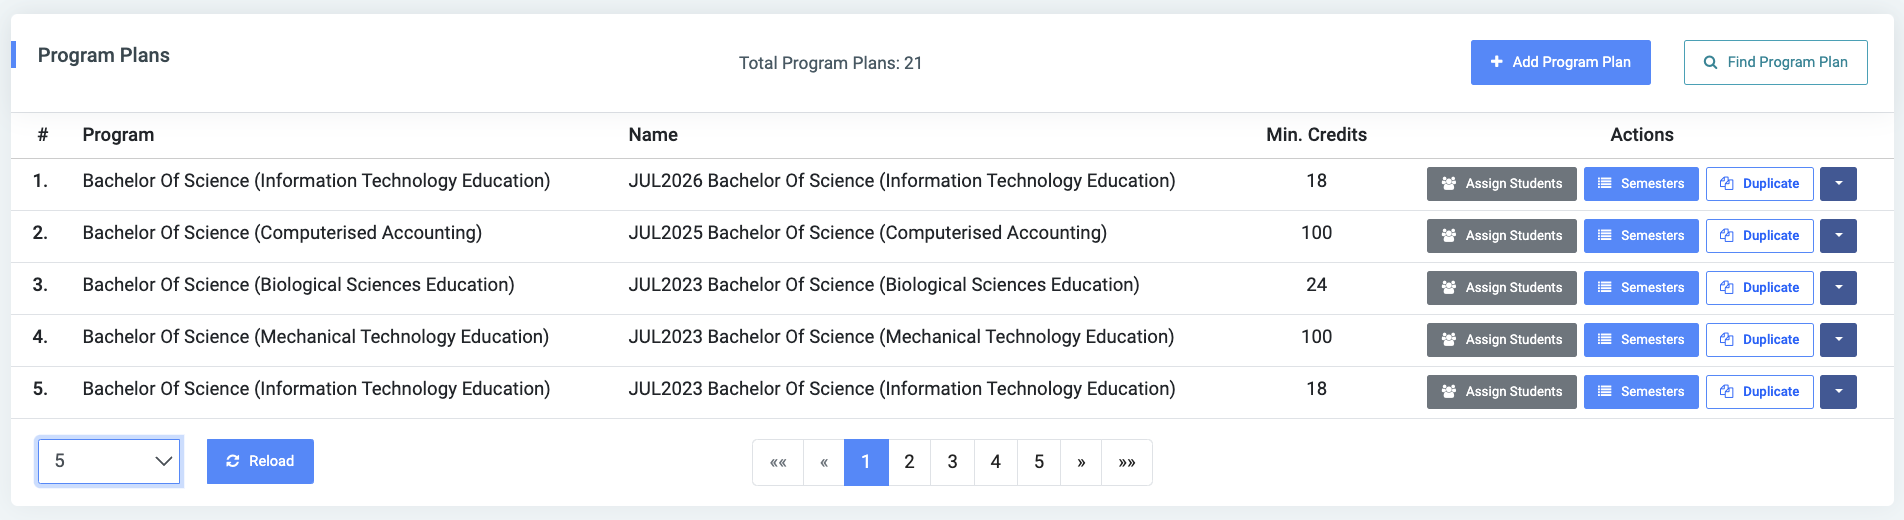
For each added plan, the user can Assign Students, Edit, Duplicate, Delete, and view details of the program plan by using the Semester button.

✑ To Edit a plan, click on the Edit button.

Change the old entries from the Edit Program Plan form and click on the Save Changes button.
✑ To Delete a plan, click on the Delete button icon.

✑ Click on the Delete button from the modal popup to confirm your actions.
✑ To Duplicate a plan, click on the Duplicate button.

The Duplicate Program Plan has two main fields as follows,

- Name: This displays a new field to enter the name of the plan
✑ Click on Duplicate Plan to make the same copy of the program plan.
To view details of the program plan, click on the Semester button. 
The semester button opens a Program Plans Details page which enables users to:
- edit all necessary details,
- add a level.
- add a course to the selected program.

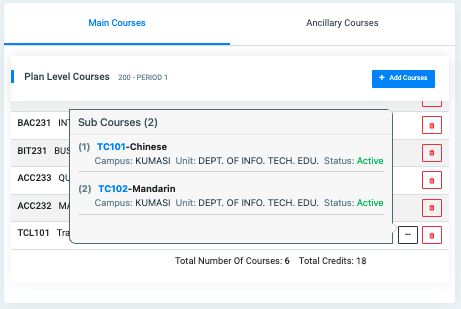
NB: In adding an umbrella course, the user would have to search and add it to the plan. Searching for sub courses isn’t supported. The user is rather given the option to view the sub courses under the mounted umbrella course. They can view them by clicking on the dash button.