Bills
This feature helps the institution set up bills for students in OSIS.
✑ From the OSIS sidebar, click on the Bills link under the Finance.
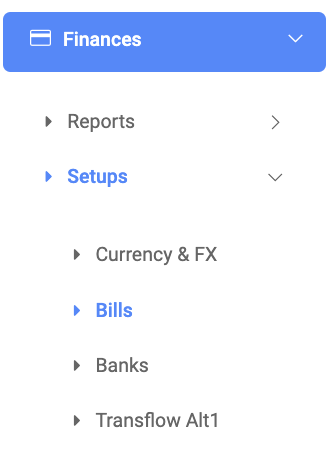
On the Setup Bills page, there are three(3) tabs namely, Setup Bills, Student Bills, and Bill Configuration Items.

To begin, open the Bill Configuration Items tab to set up configurations for the following;
Bill Configuration Items
A. Bill Configuration Items tab has Four(4) different configuration items namely, Bill Item Types, Bank Accounts, Bill Categories, and Billing Periods. These tabs help in the configuration of Bills.
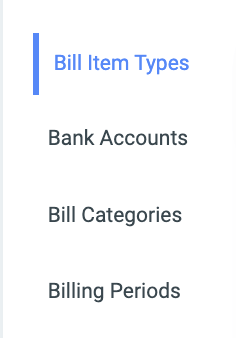
1. Bill Item Types: This is where the institution defines all items that can be billed. Eg. Student Fees, SRC Dues, etc.

✑ To add a new bill item to OSIS. Click on the Add Item Type button. This opens a Bill Item Edit/Add form with the following fields.
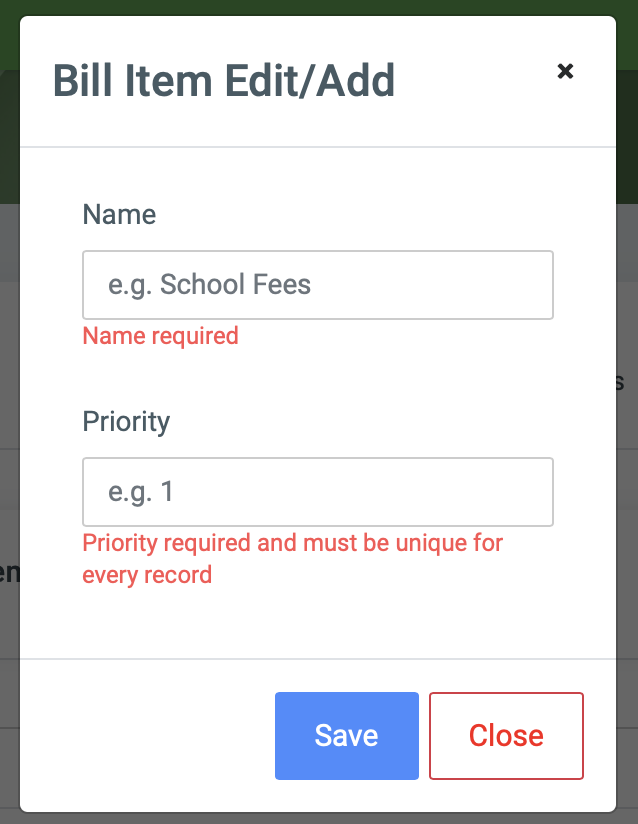
- Name: The name of the bill item. eg. GRASAG Dues.
- Priority: Enter a digit to identify its priority. The priority assigned to the items determines the order in which allotments should be done as students pay fees.
☛ This helps in the Allotments.
✑ Click on the Save button to confirm your actions.
Each Bill Item is editable and comes with an Edit button for that purpose.
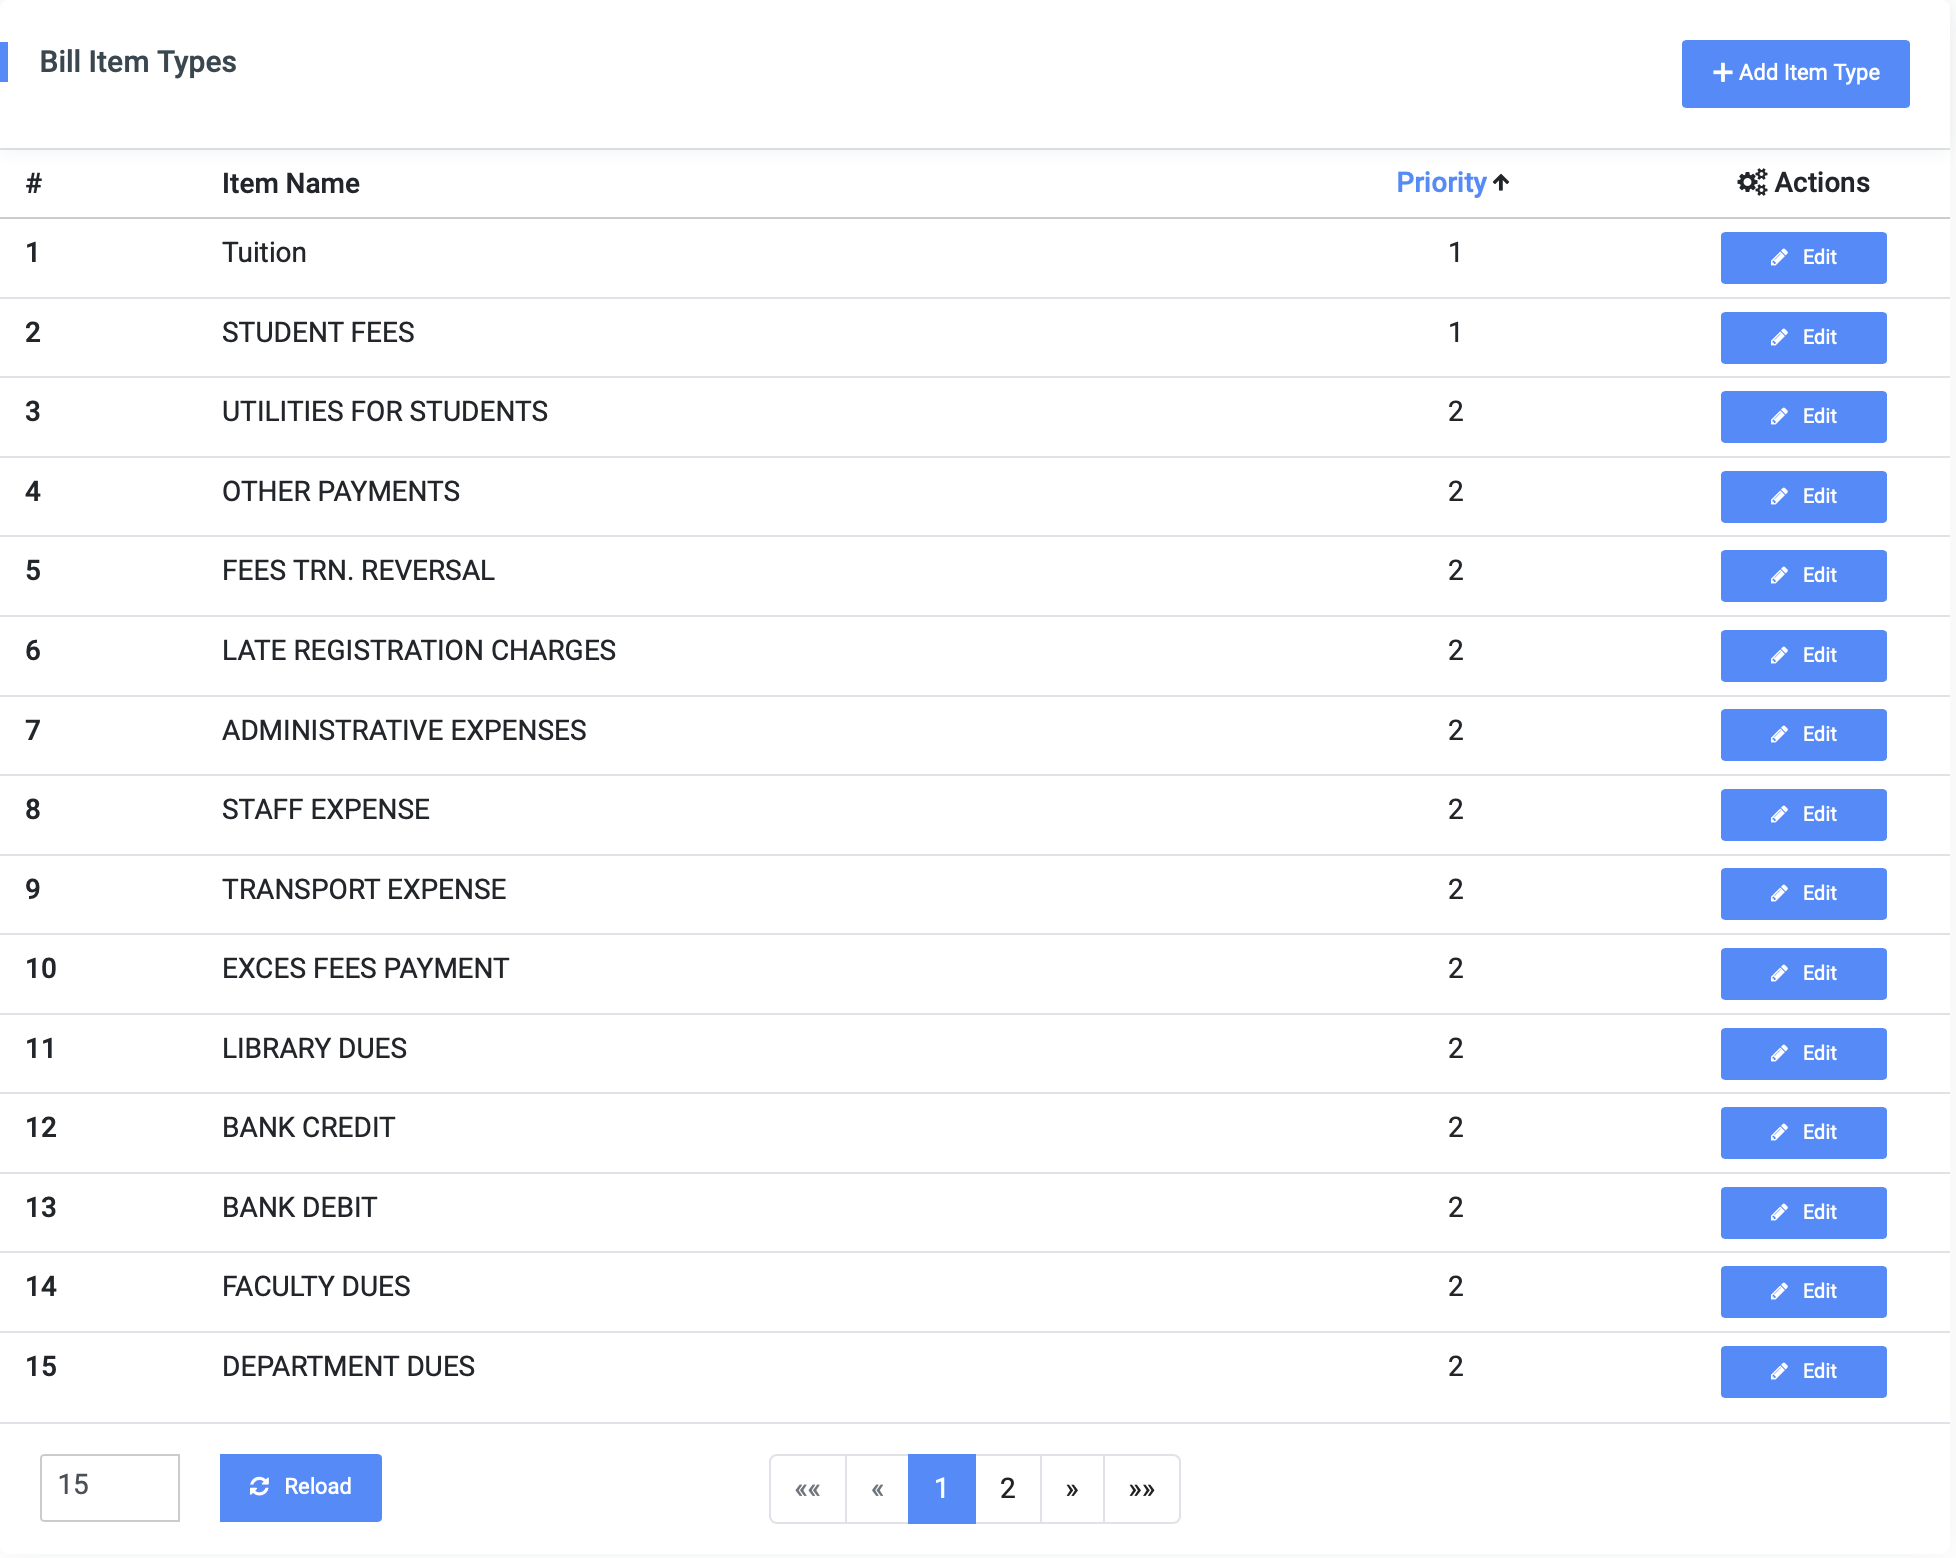
✑ To Edit a bill, click on the Edit button. 
Change the old entries from the Edit Bill Item Edit/Add form and click on the Save button.
✑ Click on the Reload button to refresh the Bill fields.
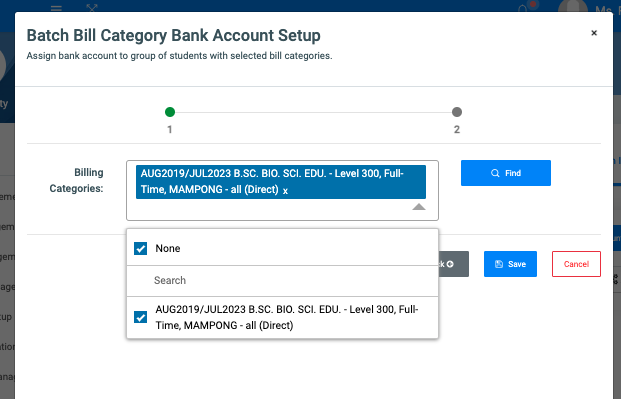
2. Bank Accounts: The feature helps in assigning a batch of students to a bank account category.
To add a new bank account, click on the Bank Account Setup button. This opens a Batch Bill Category Bank Account Setup form with the field below;
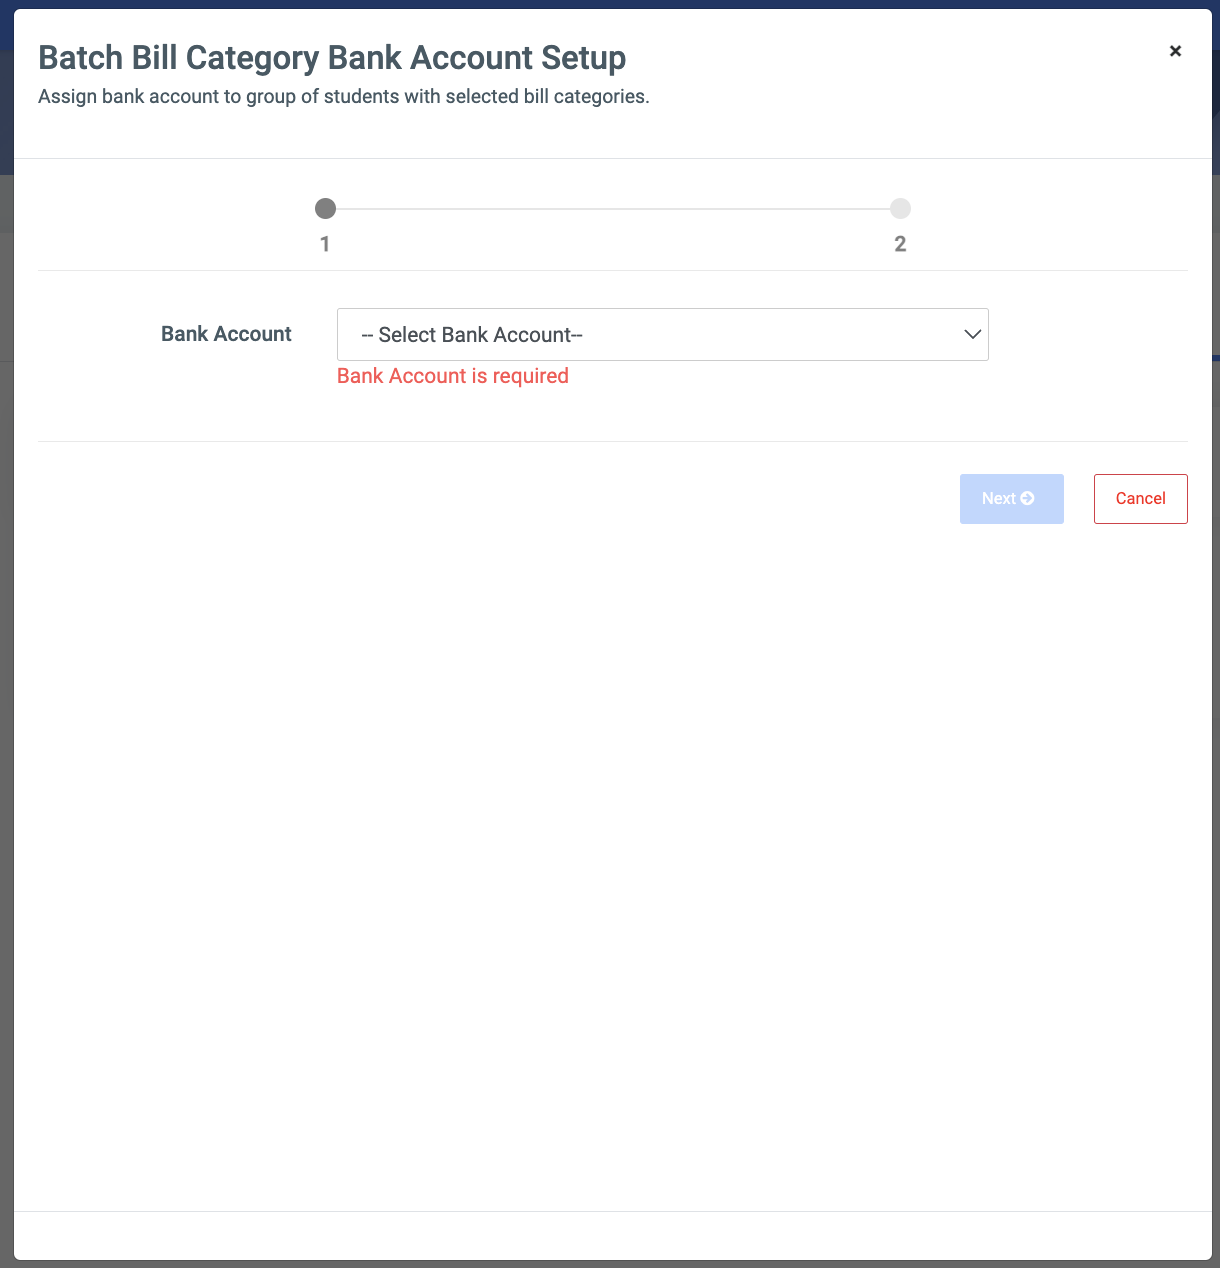
Bank Account: This is a dropdown of all bank account categories set up on OSIS. This comes from the Transflow Alt1 page.
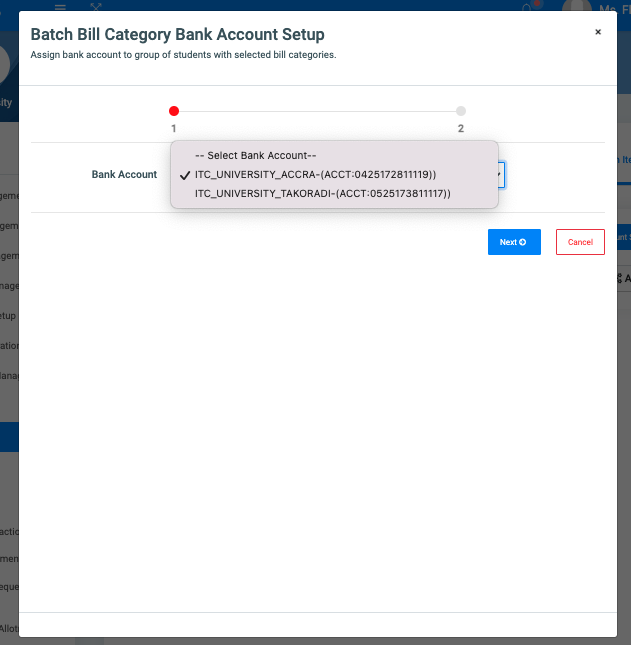
✑ Select the category from the dropdown and click on Next. Then, click on the Find button and search of a category of students.
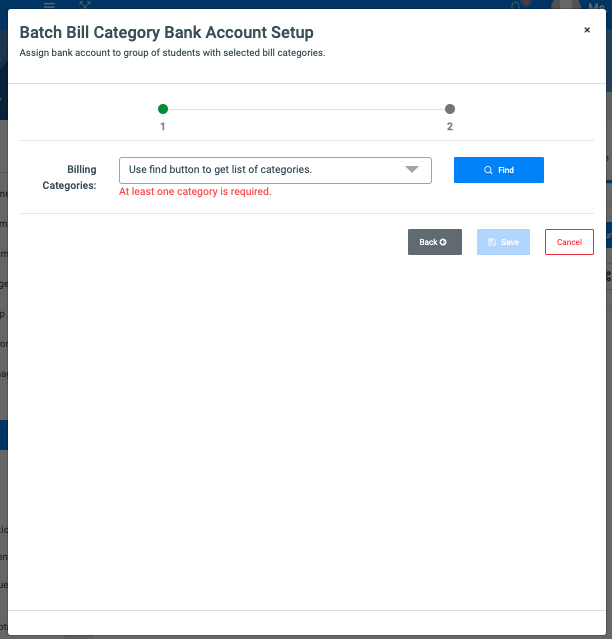
✑ Select the category or categories and click on Save.
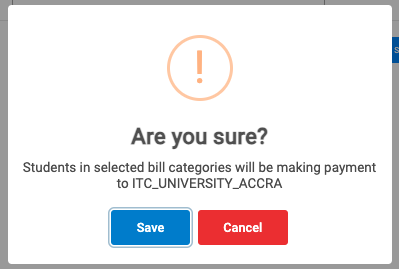
✑ Click on the Save button in the modal to confirm you actions.
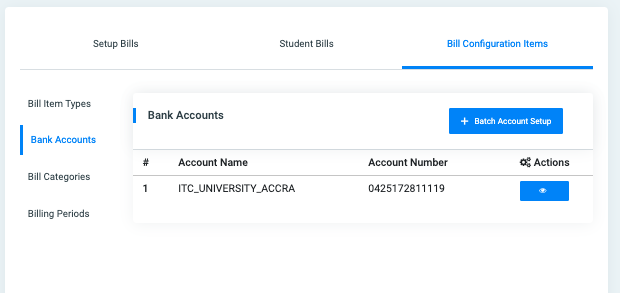
✑ Click on the “eye” icon to view and add more categories
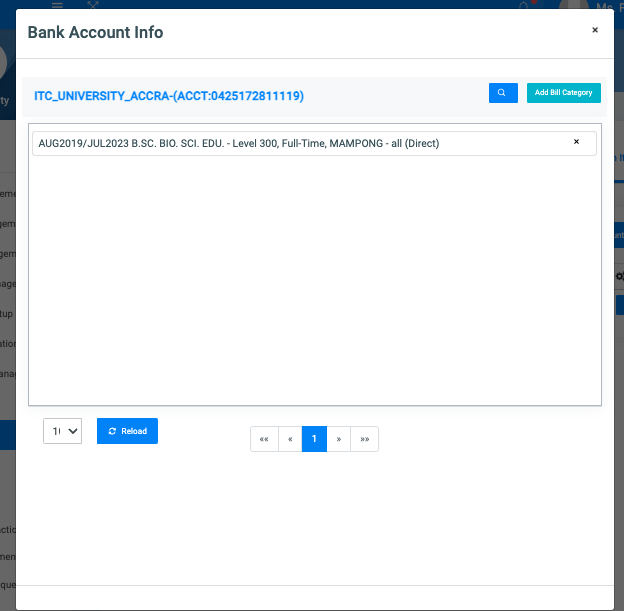
3. Bill Categories: This feature helps in the grouping of students based on Program, DOA, etc.
✑ To add a new category,

✑ Click on the Add Bill Category button. This opens a modal to show the following fields under which students can be categorized.
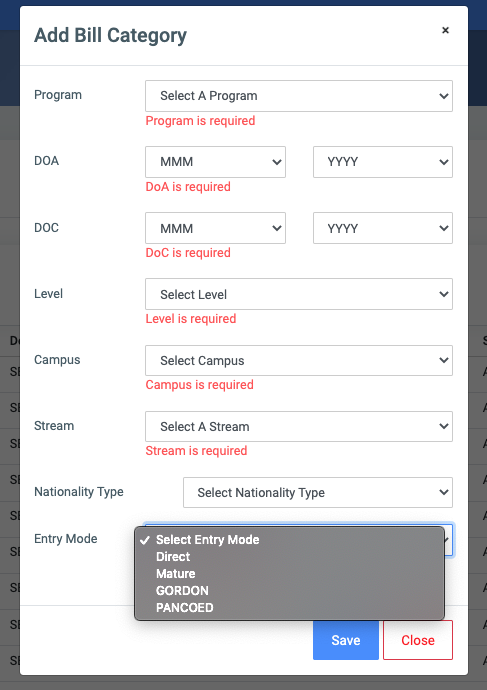
- Program: This is a dropdown list showing all programs available in OSIS. It is populated by Manage Programs
- DOA: This has two dropdowns, MMM for months and YYYY for years. Select the month and year of admission.
- DOC: This has two dropdowns, MMM for months and YYYY for years. Select the month and year of completion.
- Level: Dropdown list of all levels.
- Campus: This is a dropdown of all campuses available in OSIS. check Manage Campuses to add programs.
- Stream: This is a dropdown of all streams available in OSIS. check Manage Programs to add programs.
- Nationality Type: There are two main types, namely Local and Foreign.
- Entry Mode: This is a drop that allows the user to select the entry mode of students. It helps to handle situations where different modes of students require different bills.
✑ Click on Save to confirm your actions.
✑ To search for a particular added Bill Category, Click on the Find Bill Category button and search by any of the fields provided;
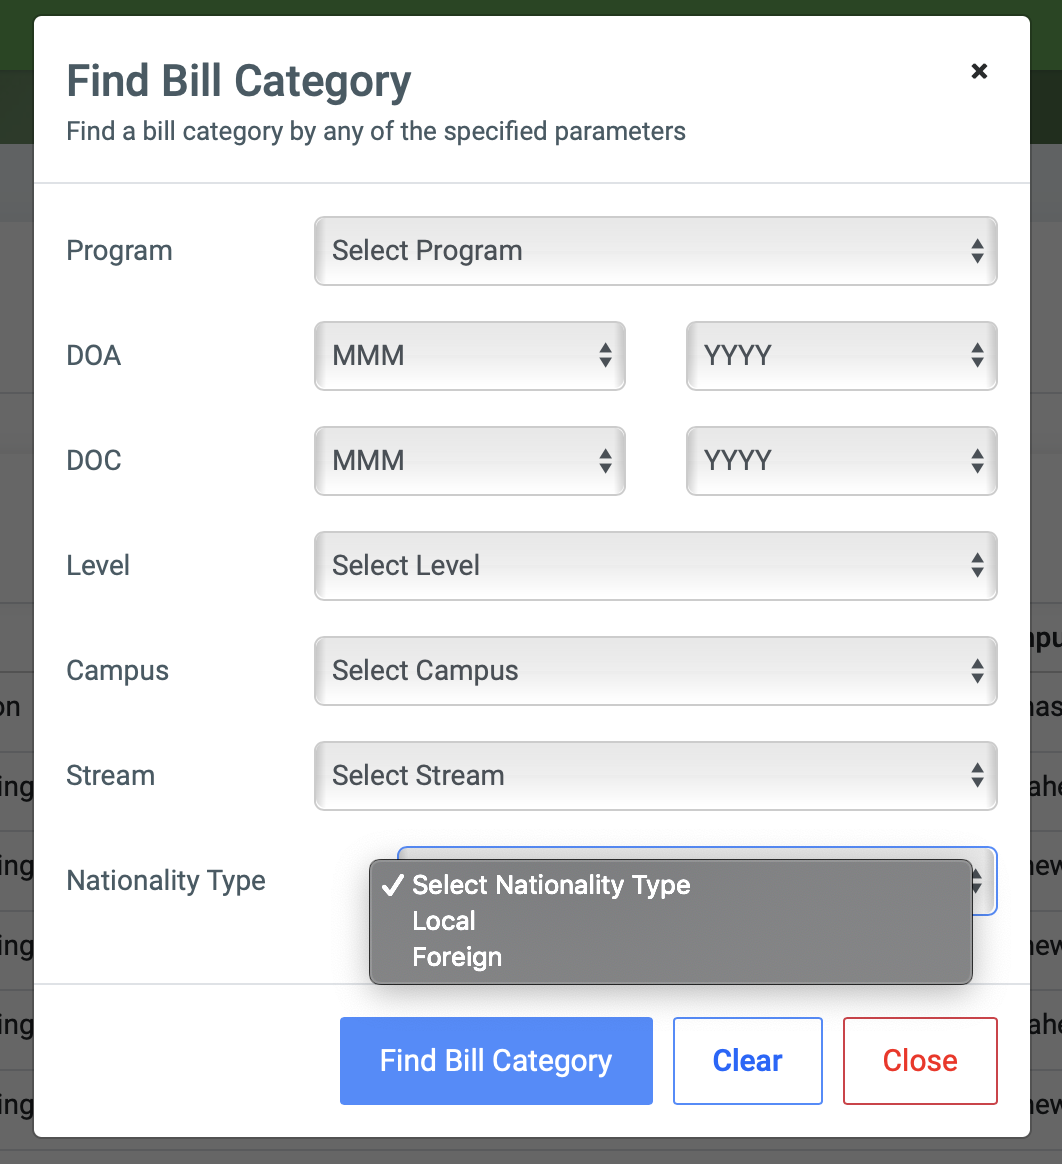
- Program.
- DOA.
- DOC.
- Level.
- Campus.
- Stream.
- Nationality Type.
✑ Click on the Find Bill Category button to confirm your actions,
✑ Click on Clear to clear all fields,
✑ Click on Close to close the modal.
All Find Bill Category fields are optional. Fill in as many as can help in narrowing down and click the Find Bill Category button. Clicking the Find Bill Category button with no entries will show all existing bill categories.
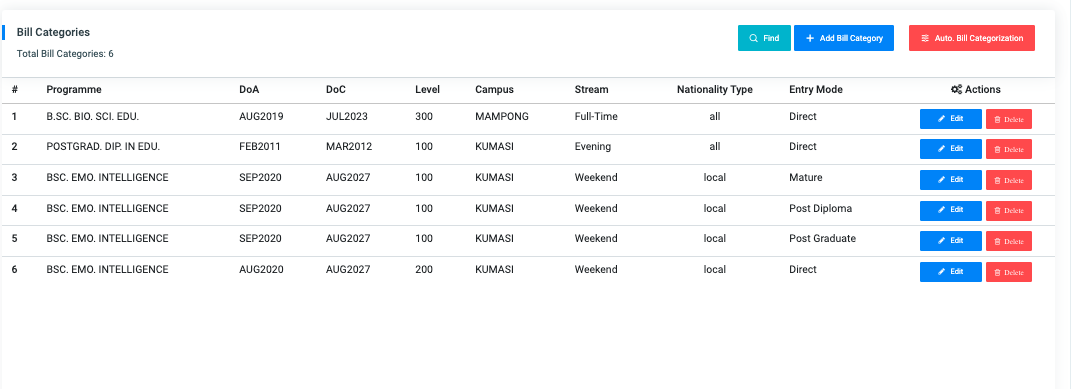
Auto.Bill Categorization: This feature brings up groups of student/applicant categories that don’t exist. It allows the user to create them.
To create possible categories that have not been created, click on the Auto Bill Categorization button on the top right of the Bill Categories page.

It comes with the following options;
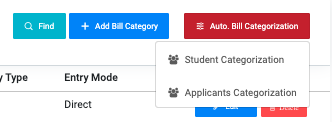
- Student Categorization
- Applicants Categorization
✑ Click on the Student Categorization to create possible student categories; You will be presented with the following fields;
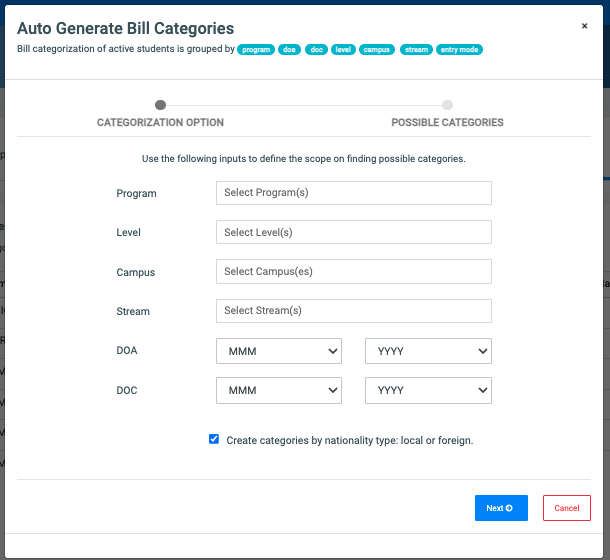
- Program;
- Level;
- Campus;
- Stream;
- DOA;
- DOC.
Perform your search with any of the fields above and click on Next.
NB: The Program field is a multi-select.
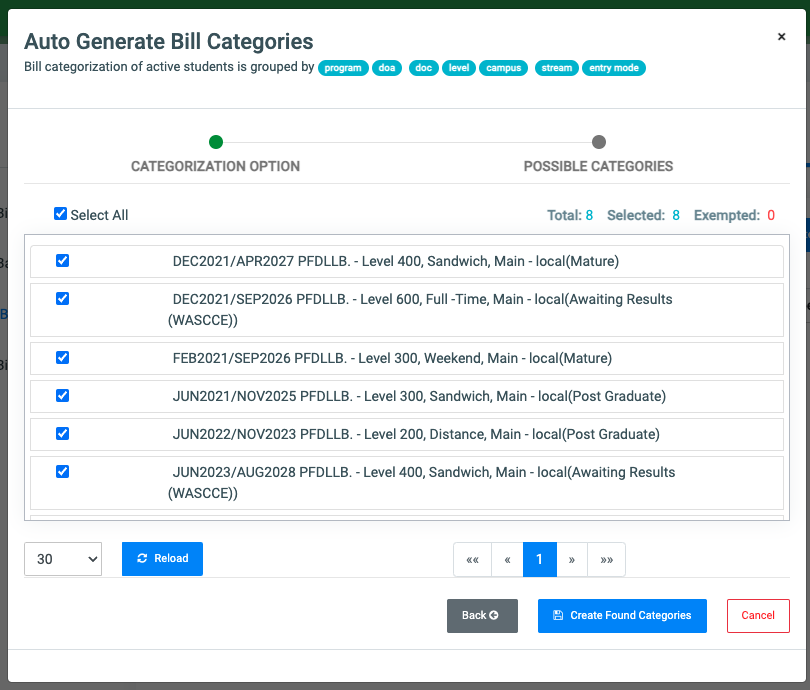
✑ Click on the Create Found Categories and confirm your actions.
Click on the Applicant Categorization to create possible applicant categories; You will be presented with a field to select an admission form;
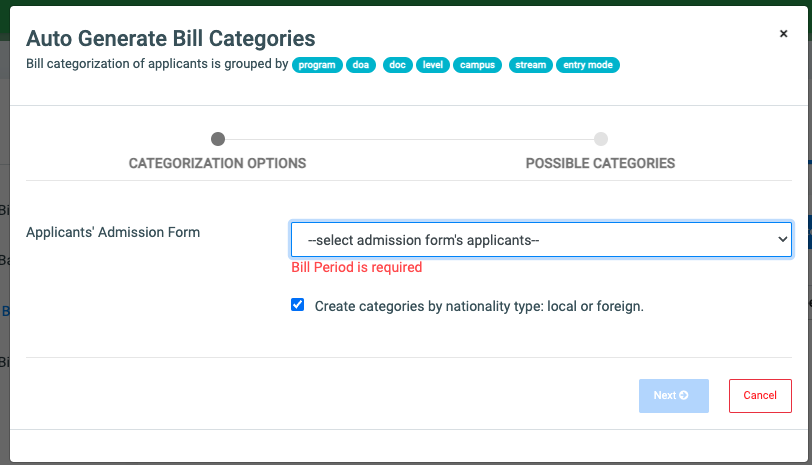
The list of possible applicant categories is brought up
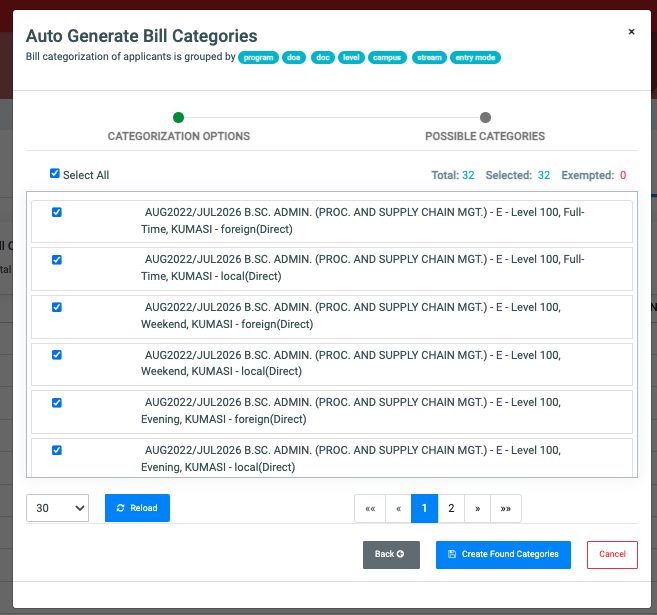
✑ Click on the Create Found Categories and confirm your actions.
Each Bill Category is editable and comes with an Edit button for that purpose.
✑ To Edit a bill category, click on the Edit button. 
Change the old entries from the Edit Bill Category form and click on the Save button.
✑ Click on the Reload button to refreshBill Category fields.
Each Bill Category can be deleted as well.
✑ To Delete a bill category, click on the Delete button. 
3. Billing Periods: This feature helps to set the period to open or close bills. Some institutions open every semester, while others once in a year.
To create a new period,

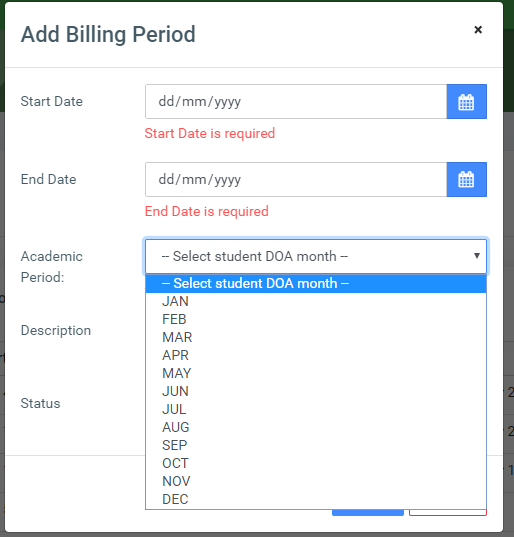
✑ Click on the Add Billing Period button. This opens an Add Billing Period form with the following;
☛ Concurrent billing period: This feature allows OSIS users to specify billing periods to be applied to student transactions depending on what their admission batch is.
Therefore, Multiple billing periods can run concurrently in an institution. This depends on the admission batch (i.e. Date of Admission) a specific billing period may be applied to billing.
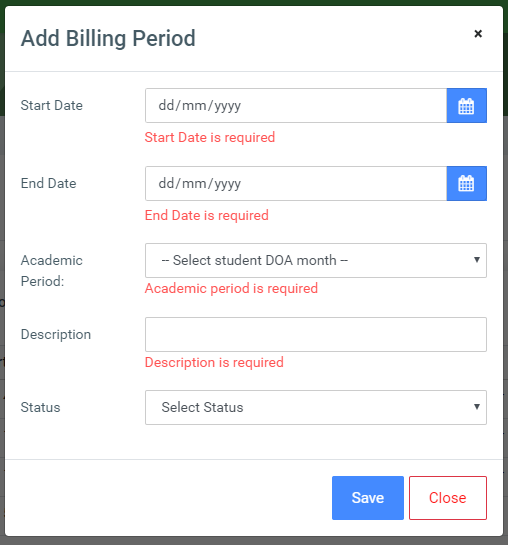
- Start Date: Enter the date you want to start billing.
- Academic Period: This is a dropdown list of Date of Admission(DOA) month. The user can specify the month on DOA to run a concurrent billing period.
- Description: Enter brief details about the bill.
- Status: This is a dropdown with two(2) main items to select. Open and Closed.
✑ Click on Save to confirm actions.
✑ To search for a particular added Bill Period, Click on the Find Billing Period button and fill in the details for that Billing Period by;
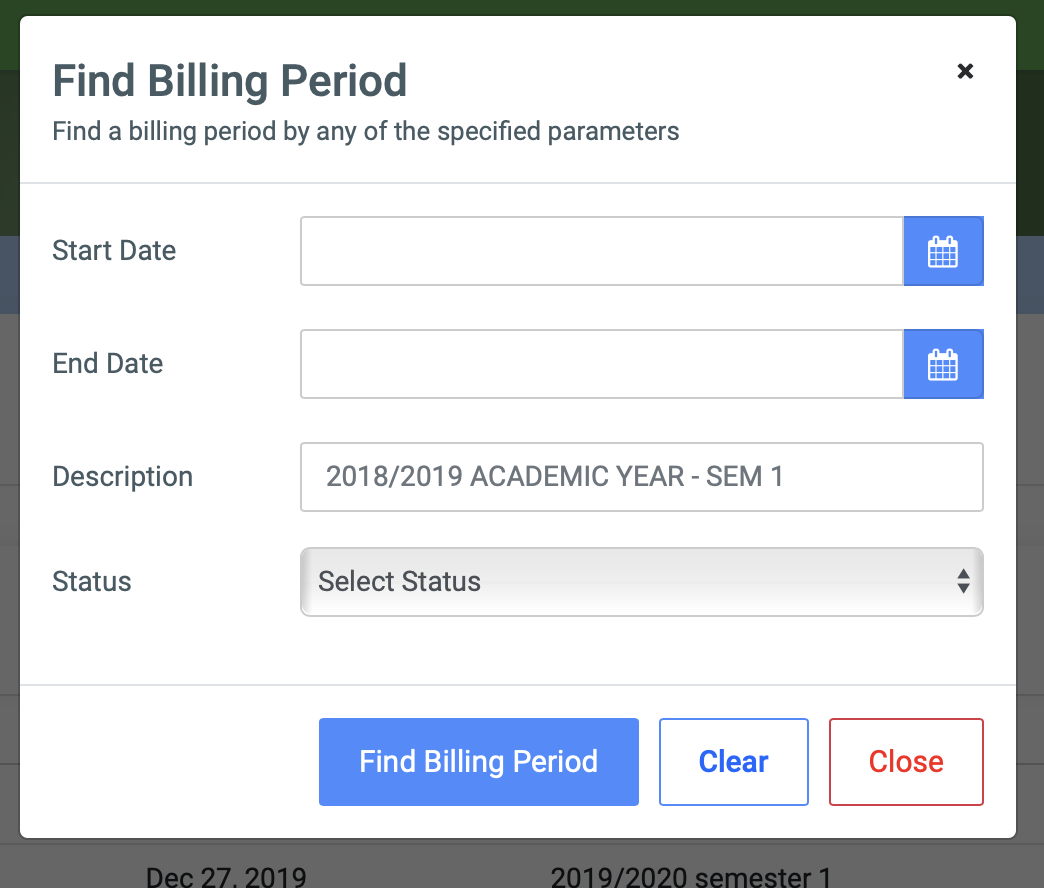
- Start Date:
- Description:
- Status:
✑ Click on the Find Billing Period button to confirm your actions,
✑ Click on Clear to clear all fields,
✑ Click on Close to close the modal.
☛ All Find Billing Period fields are optional. Fill in as many as can help in narrowing down and click the Find Billing Period button. Clicking the Find Billing Period button with no entries will show all existing billing periods.
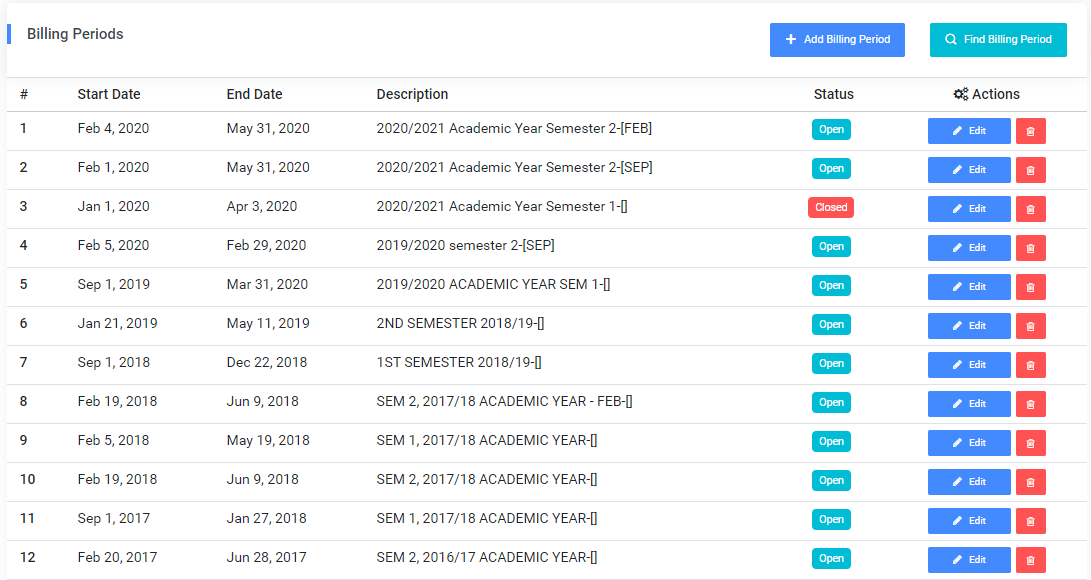
Each Bill Period is editable and comes with an Edit button for that purpose.
✑ To Edit a billing period, click on the Edit button.
Change the old entries from the Edit Billing Period form and click on the Save button. Pics
✑ Click on the Reload button to refresh the Billing Period fields.
NB: Billing Periods will remain active until a new one is created to replace them. Hence the disregard for an end date on a billing period creation.
Setup Bills
B. Setup Bills: This feature helps users to provide or define details of the bill categories created.

✑ Click on the Setup Bills tab. This opens the tab page with three(3) buttons namely, Add Bill button, Find Bill buttons and Replicate Bill button.

✑ Click on the Add Bill button to add a new bill to OSIS. This opens an Add Bill form with the following details;
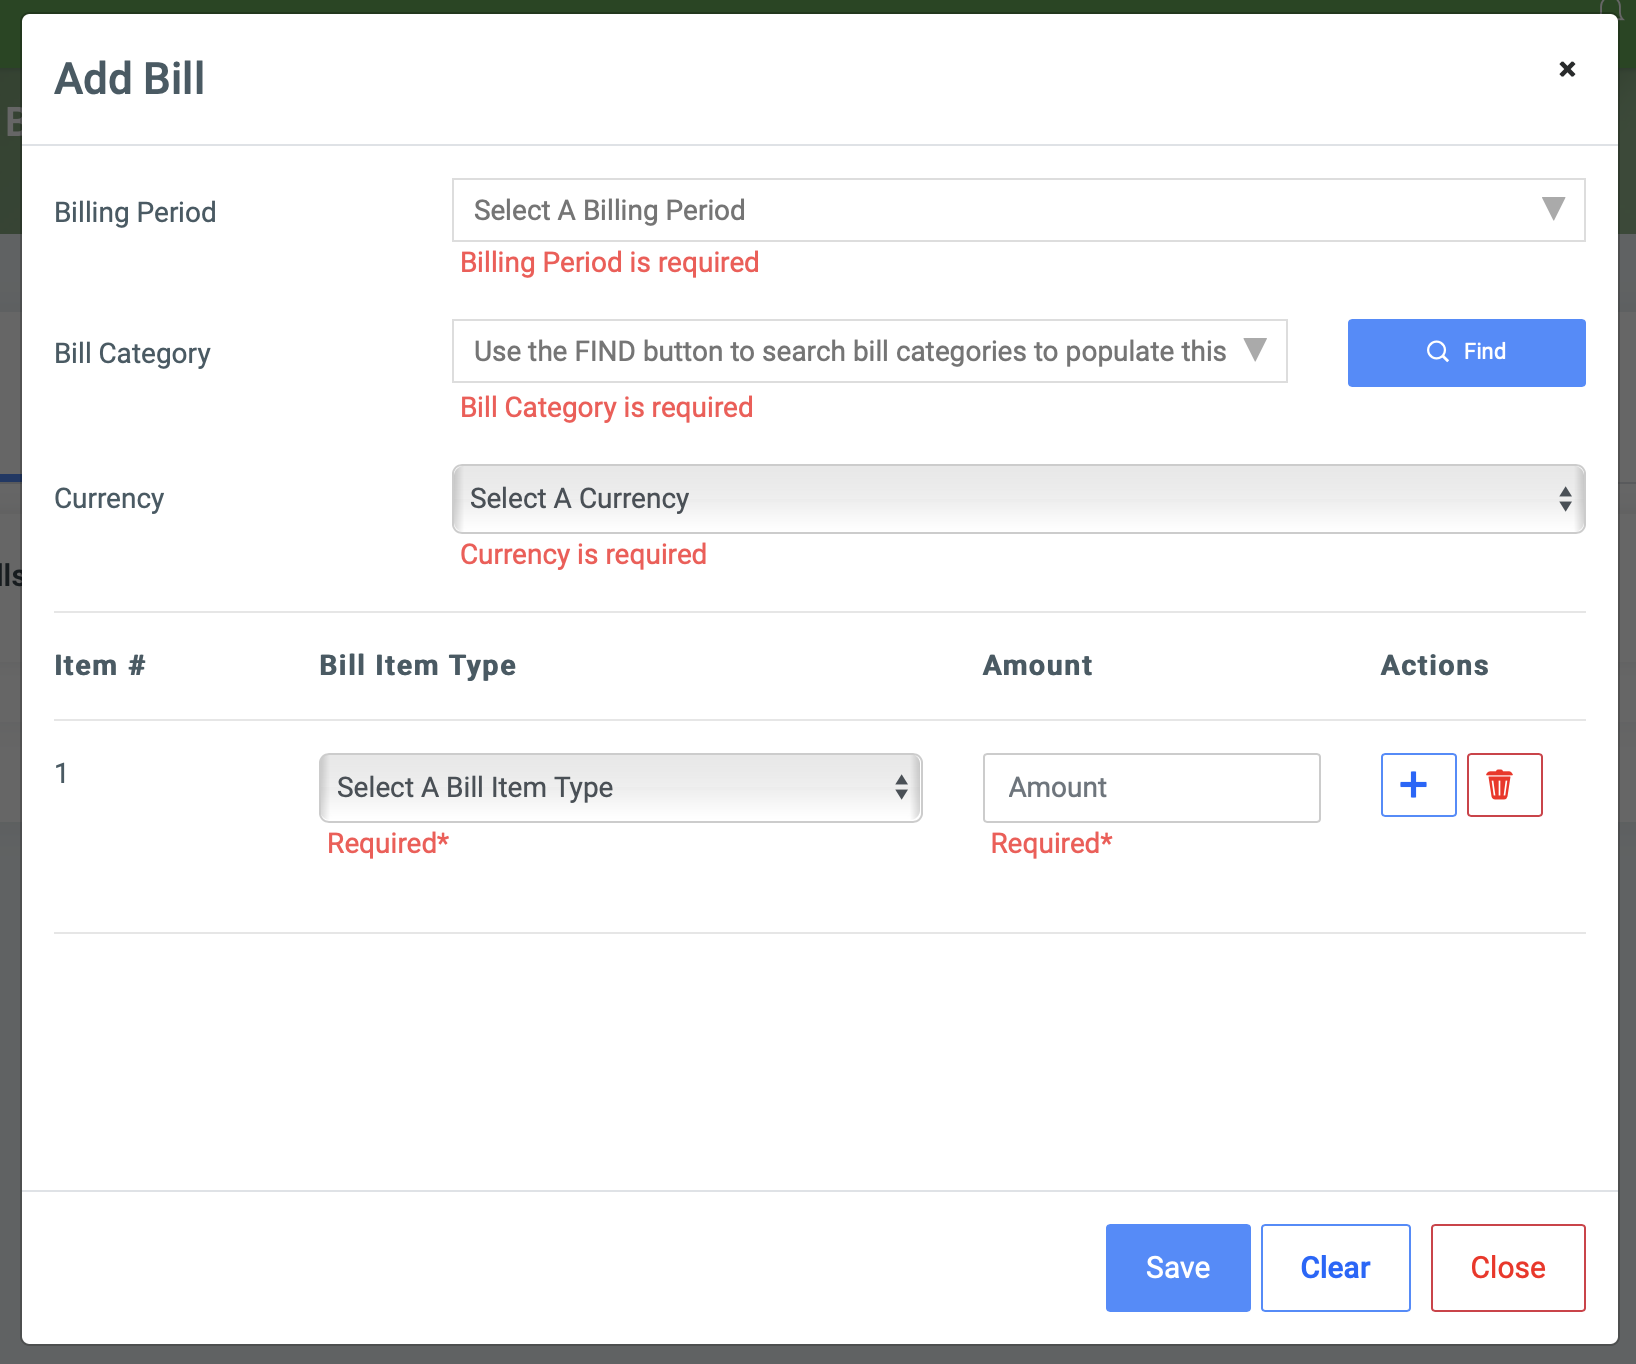
- Billing Period: This is a dropdown to displaying all the Billing Periods in OSIS. To create a new billing period Click on the Bill Configuration Items tab to configure.
- Bill Category: In other to find the Bill Category, click on the Find button
 which opens a Find Bill Categories model with the following fields;
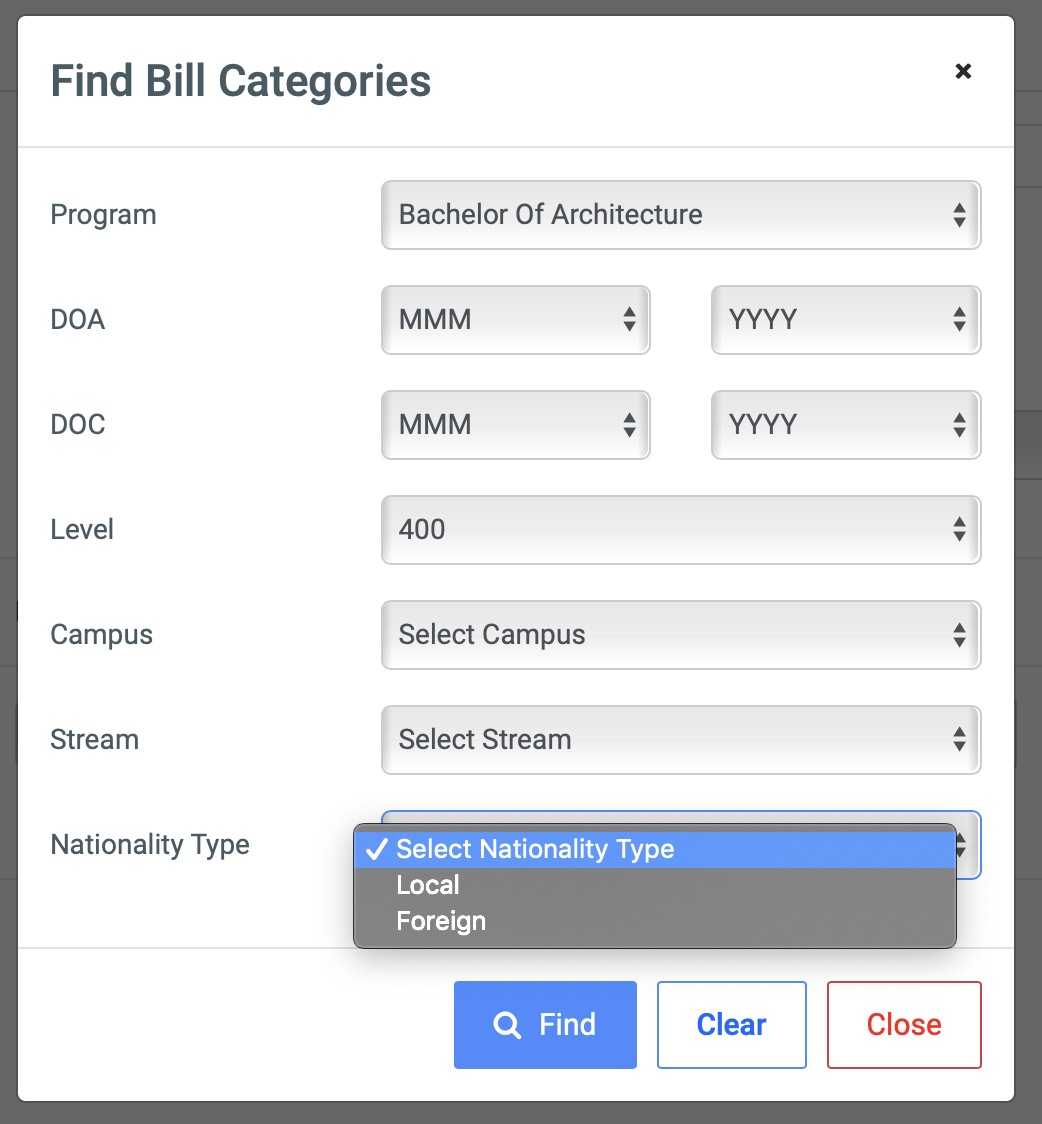
- Program: This is a dropdown list showing all programs available in OSIS. It is populated from Manage Programs.
- DOA: This has two dropdowns, MMM for months and YYYY for years. Select the month and year of admission.
- DOC: This has two dropdowns, MMM for months and YYYY for years. Select the month and year of completion.
- Level: Dropdown list of all levels.
- Campus: this is a dropdown of all campuses available in OSIS. check Manage Campuses to add programs.
- Stream: this is a dropdown of all streams available in OSIS. check Manage Programs to add programs.
- Nationality Type: There are two main types, namely Local and Foreign.
✑ Select 1 or more categories for which the bill is being created
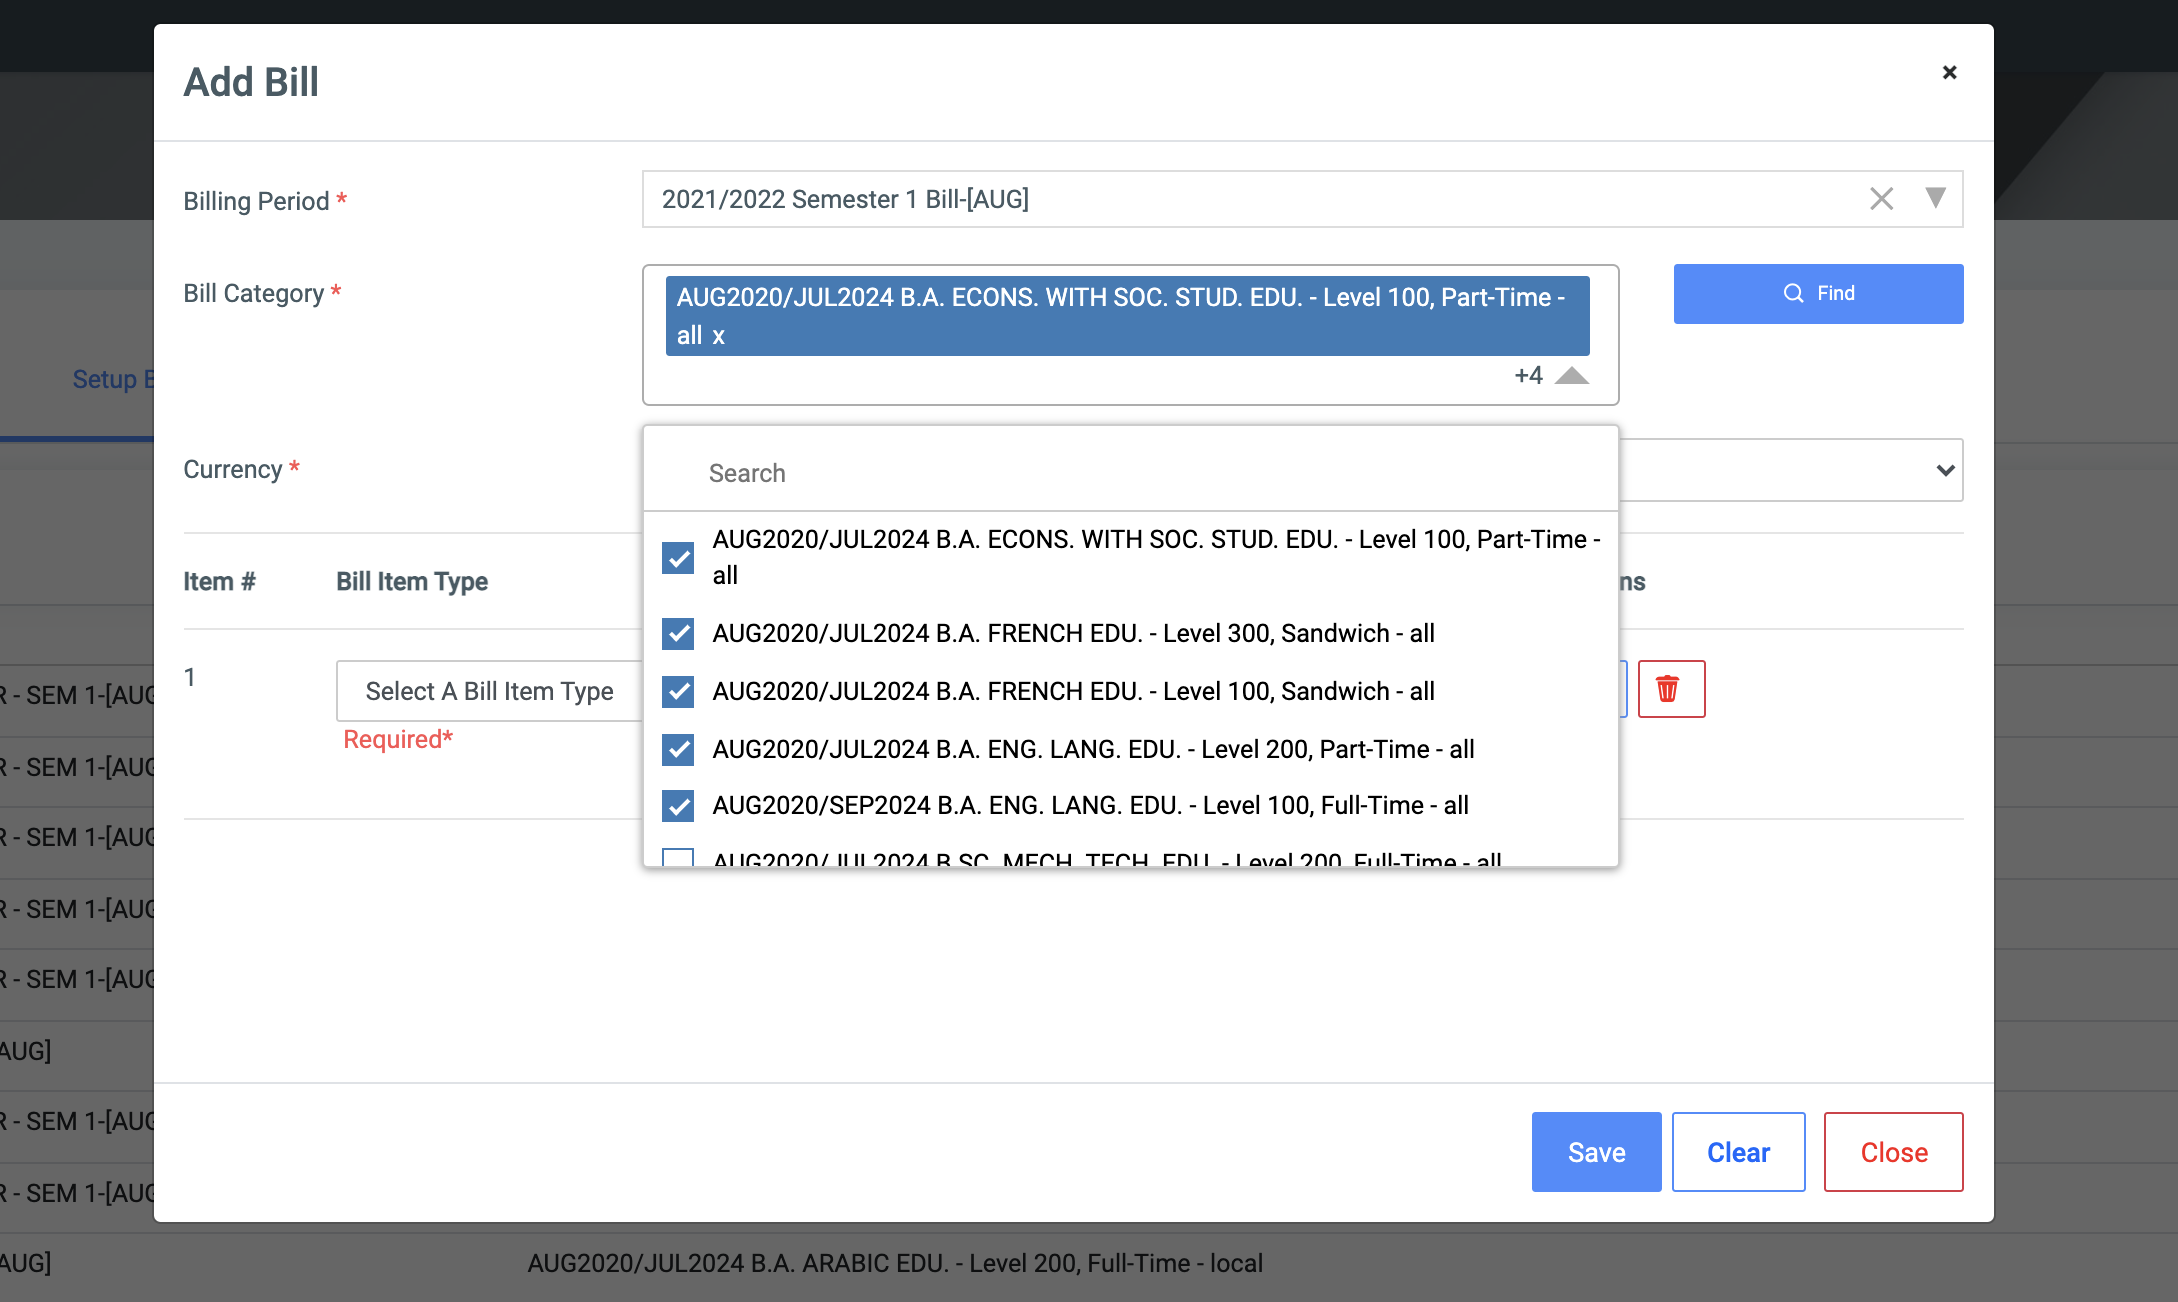
- Currency: Select your currency.Items:
- Foreach Item added select,
- Bill Item type: this is the dropdown of all populated bill items type.
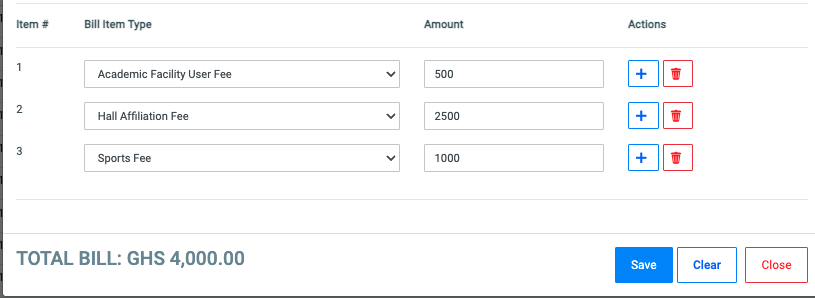
- Amount: Enter the required amount for each item type.
- Action: this has two buttons namely; Plus button and Delete button.
- Click the Plus button to add another item.
- Click the Delete button to delete an item.
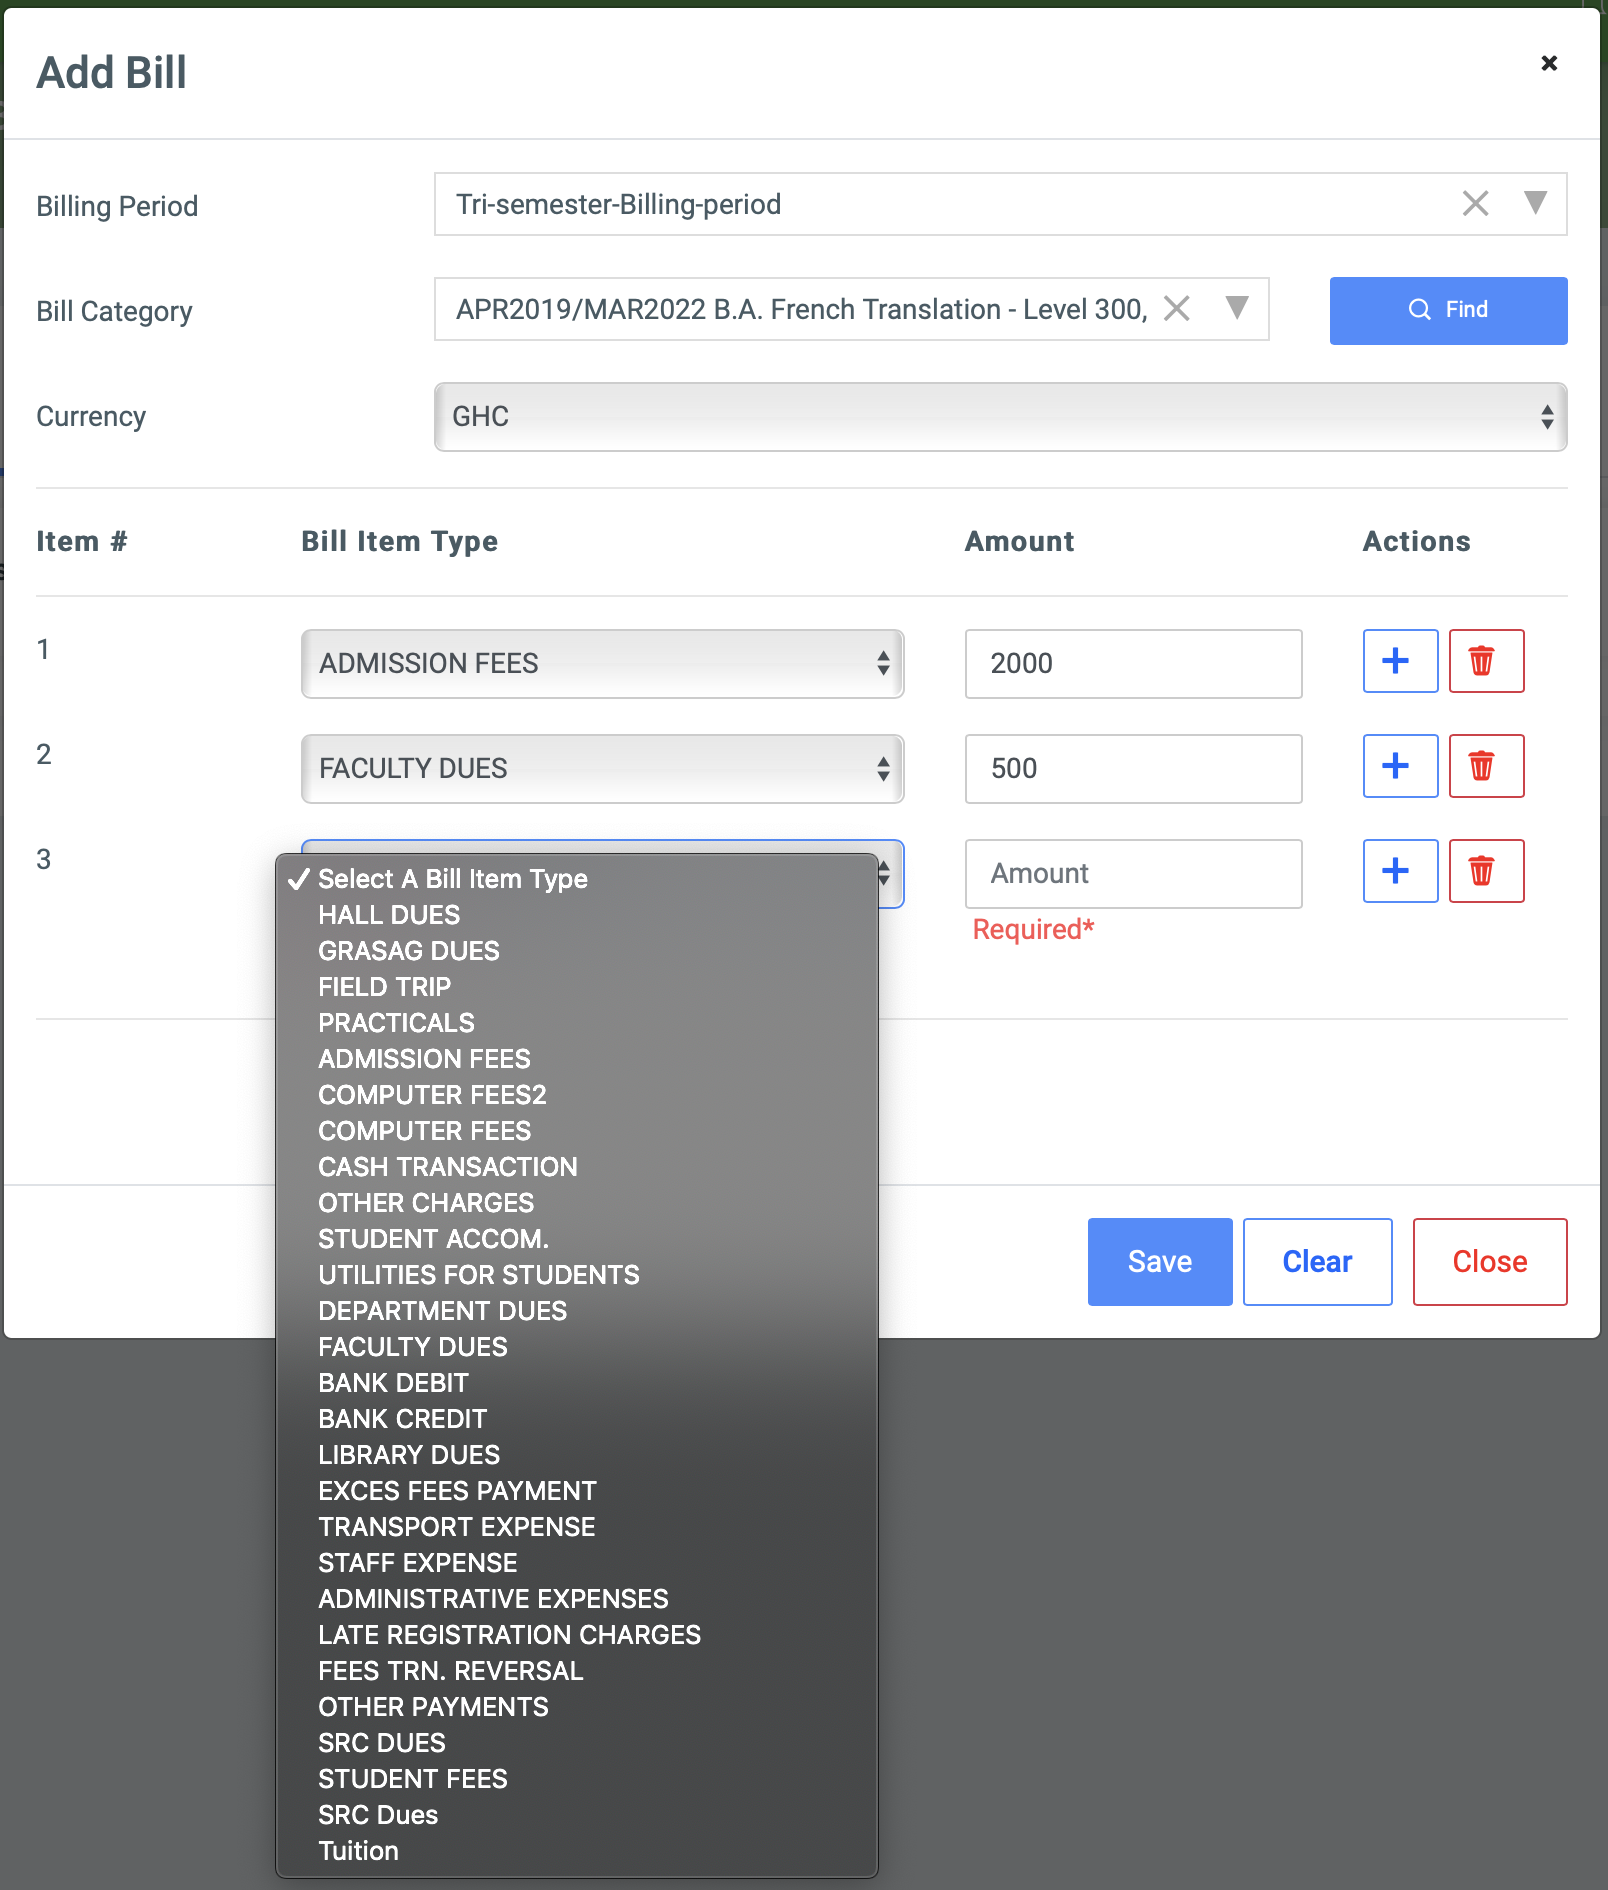
✑ Click on the Save button to confirm your actions.
NB: OSIS automatically calculates bills as they are being added at the bottom on of the form.
✑ To search for a particular added Bill, Click on Find Bill button and fill in the details for that Bill by;
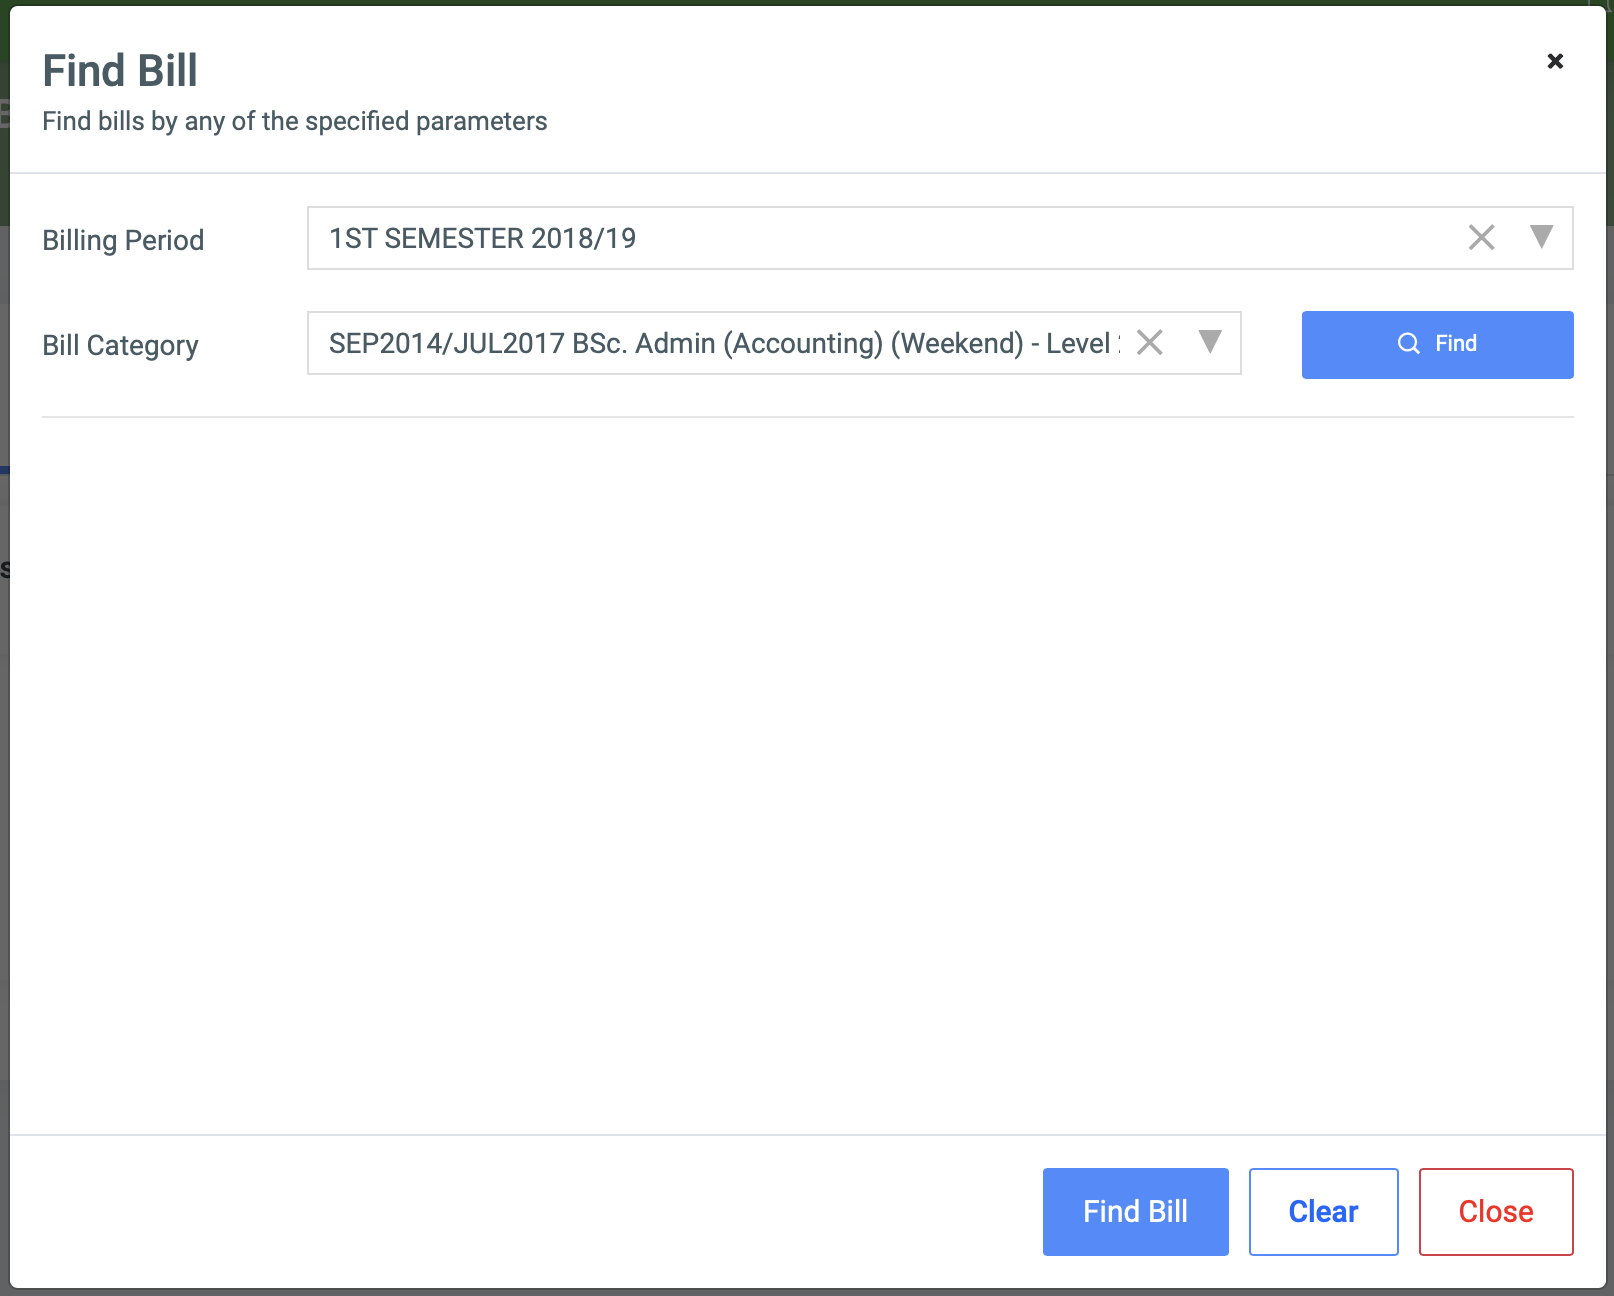
- Billing Period:
- Bill Category:
✑ Click on the Find Bill button to confirm your actions,
✑ Click on Clear to clear all fields,
✑ Click on Close to close the modal.
☛ All Find Billing Period fields are optional. Fill in as many as can help in narrowing down and click the Find Bill button. Clicking the Find Bill button with no entries will show all existing bills.
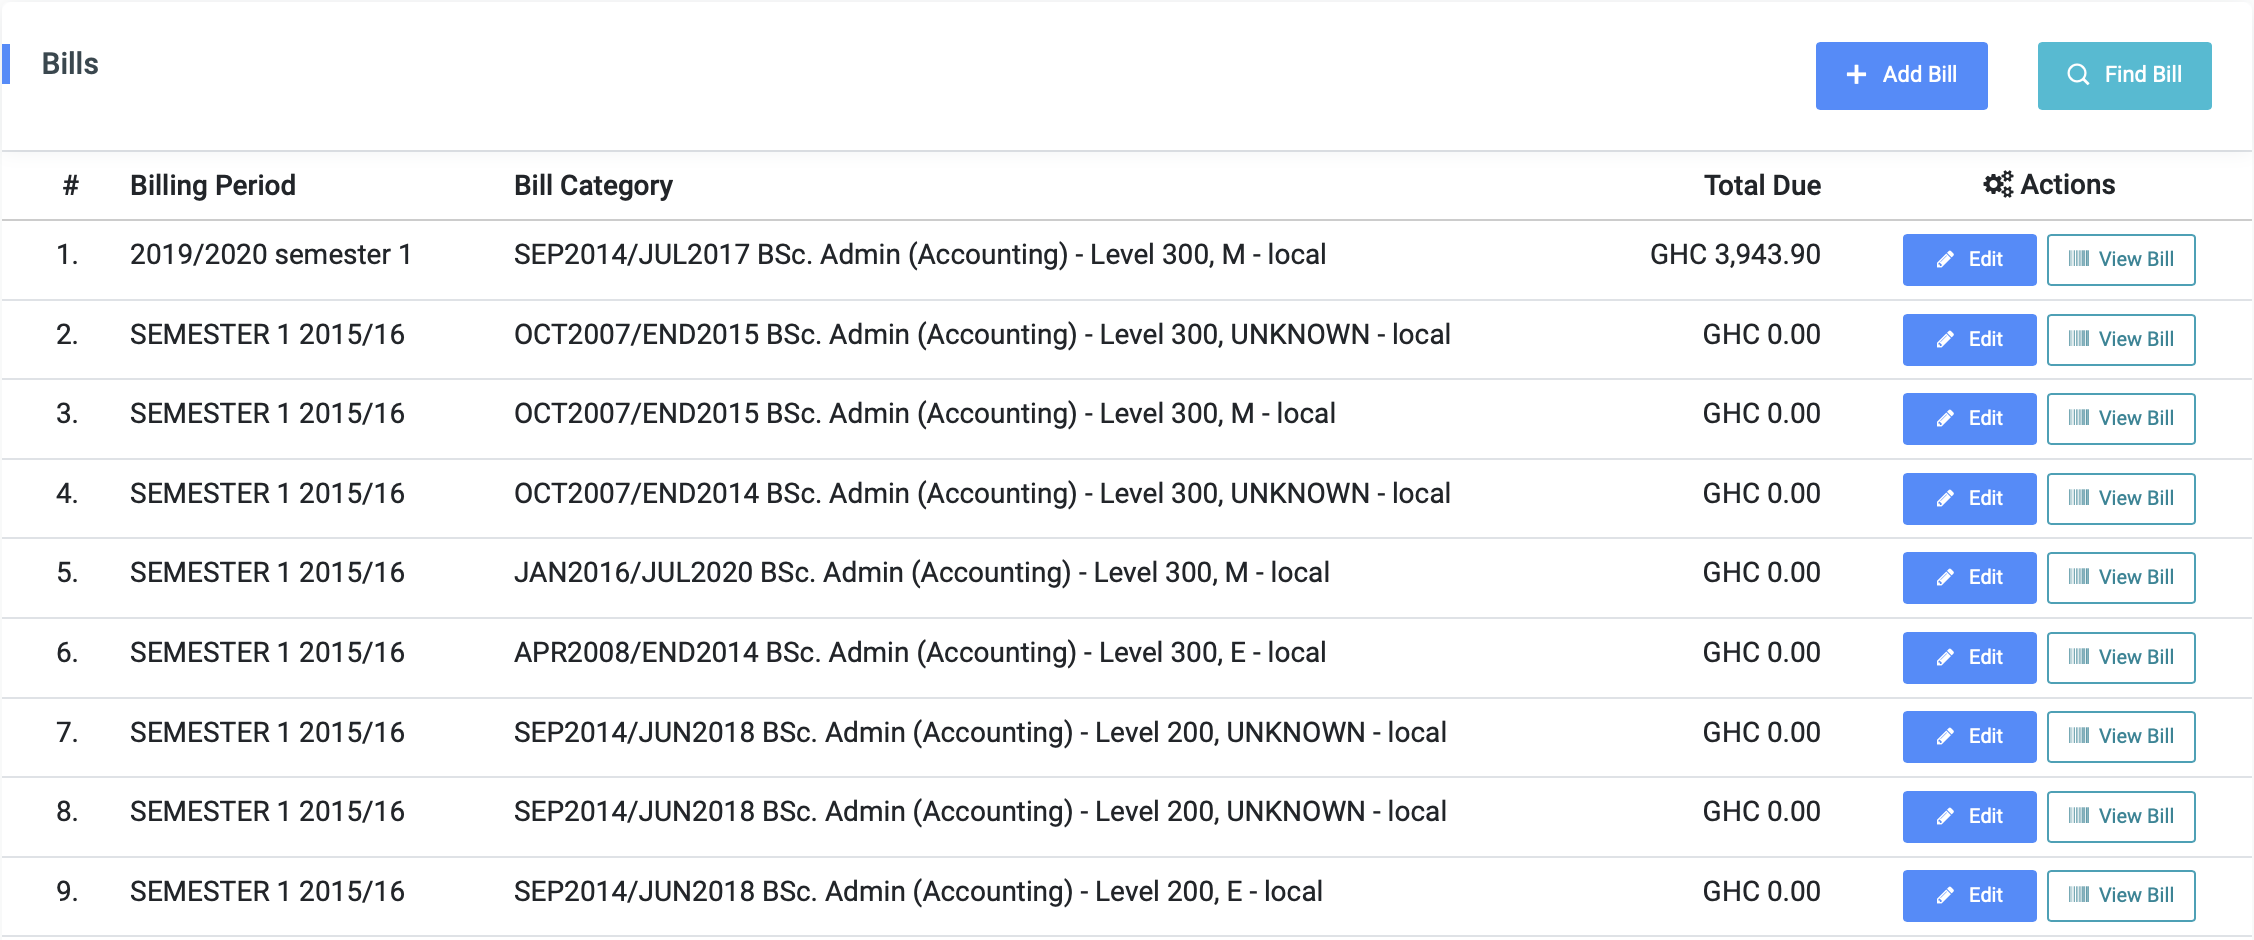
For each added Bill, the user can Edit them.
✑ To Edit a bill, click on the Edit button. 
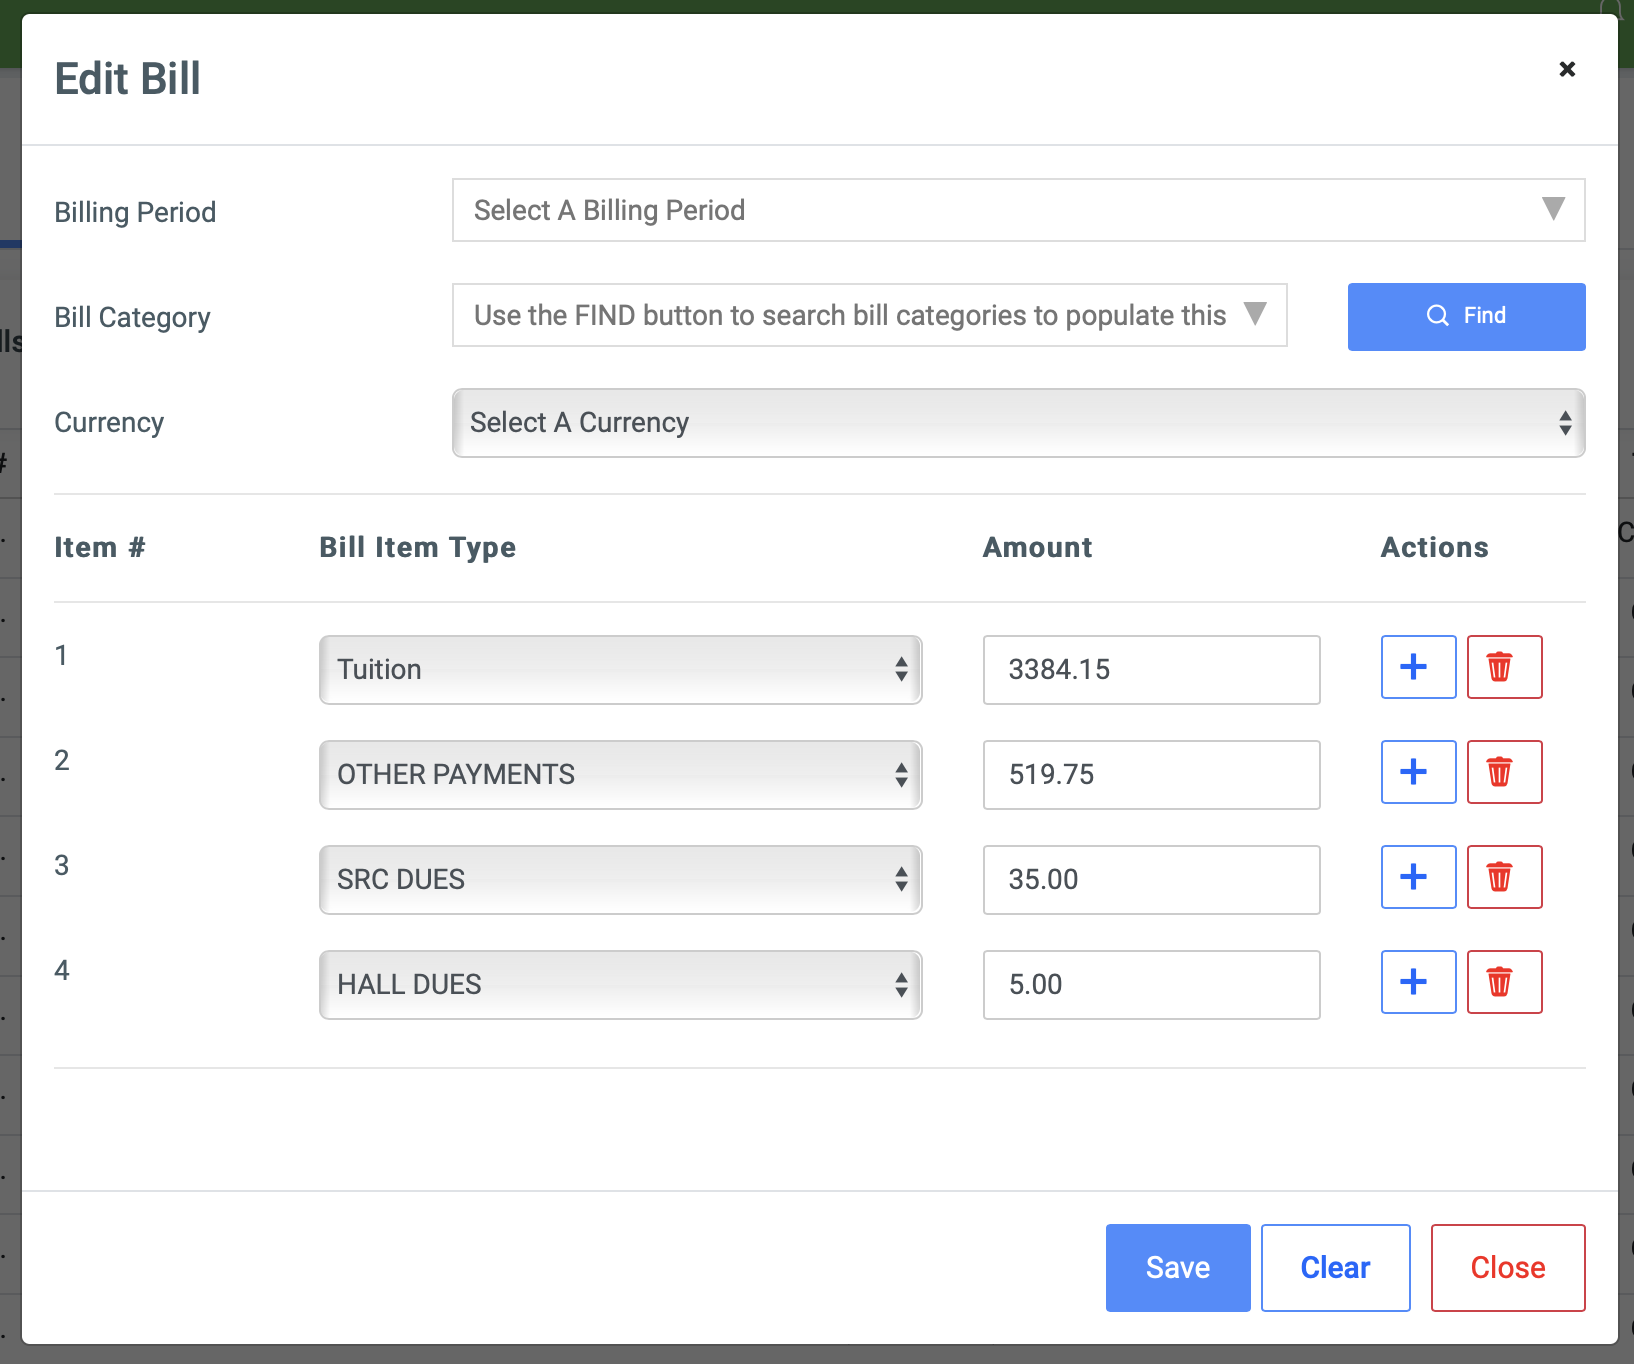
Change the old entries from the Edit Bill form and click on the Save button.
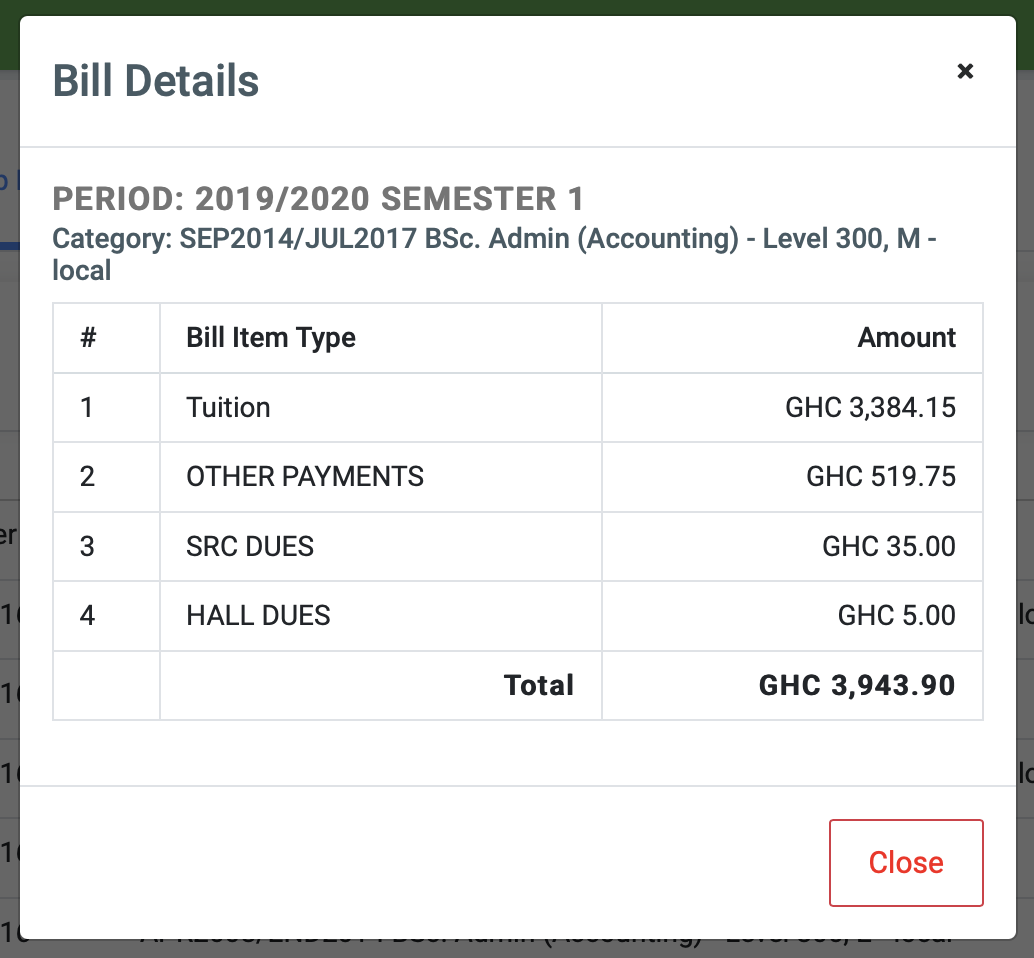
✑ To view bills, click on the View Bill button.
✑ Click on the Reload button to refresh the Bill fields.
✑ To Replicate Bill, Click on the Replicate Bill  button. This will open a wizard modal with three main steps namely:
Step One(1) – Source Billing Period:
This step provides a dropdown list of all the billing periods available. The user can select any he/she wants to replicate.
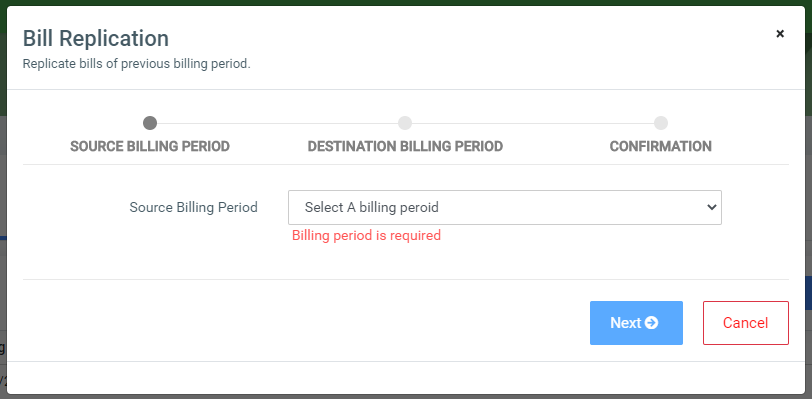
Click on the Next button to continue.
Step Two(2) – Destination Billing Period:
This can now select the newly created billing period he/she wants to replicate to.
NB: The Academic Period(DOA month) of both the Source and Destination billing period must be the same.
Click on the Back button to go back.
Click on the Next button to the final step.
Click on Cancel to end the process.
Step Three(3) – Confirmation:
This step simply displays the details of the billing periods.
Click on the Finish button to confirm the replicate.
Student Bills
C. Student Bills: This feature helps to assign bills to students in a batch or individually.

✑ Click on the Student Bills tab. This opens the tab page with four(4) buttons namely; the Find button, Batch Assign button, Export To Excel button, and Batch Reverse Bills button.

1. Batch Assign button:
✑ Click on Batch Assign to generate or assign bills to a batch of students. This will open a modal with the following details.
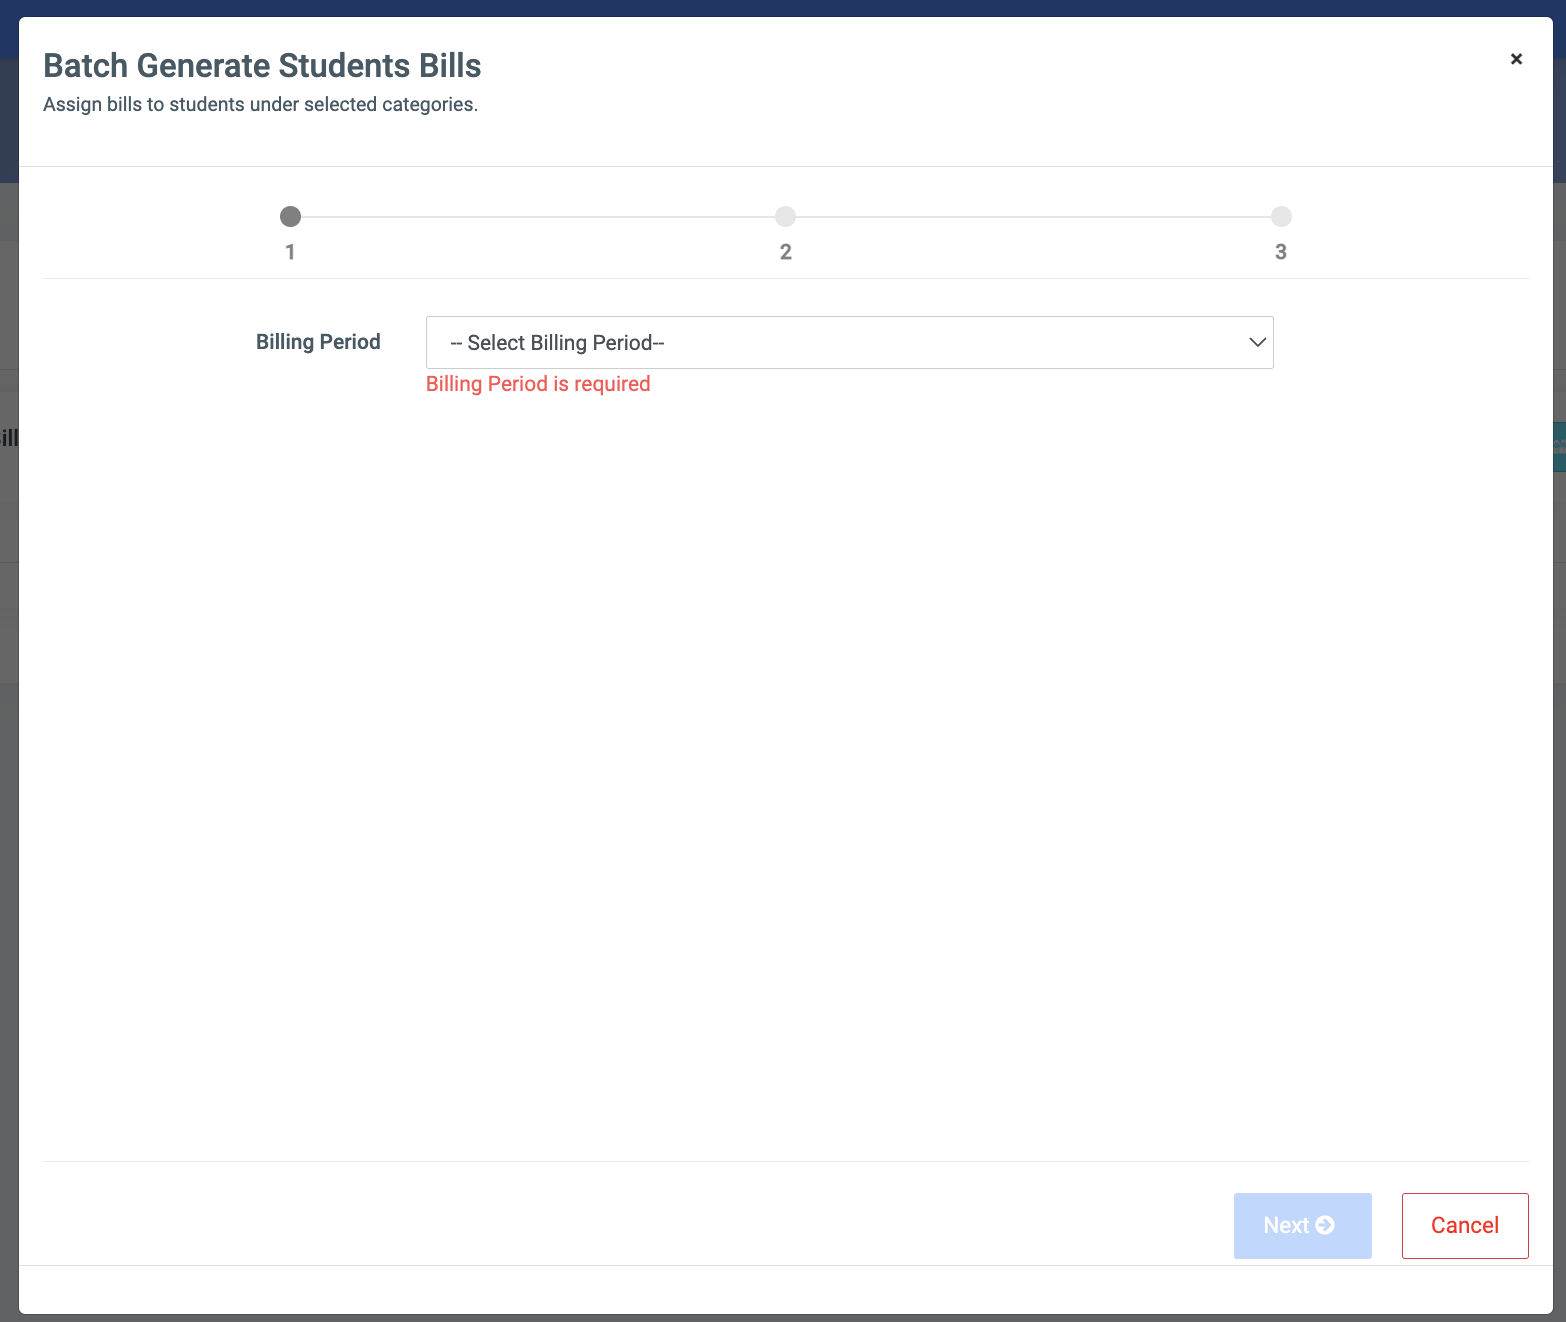
Billing Periods: This is a dropdown list showing details of all billing periods created. Select the billing period and click on Next to proceed.
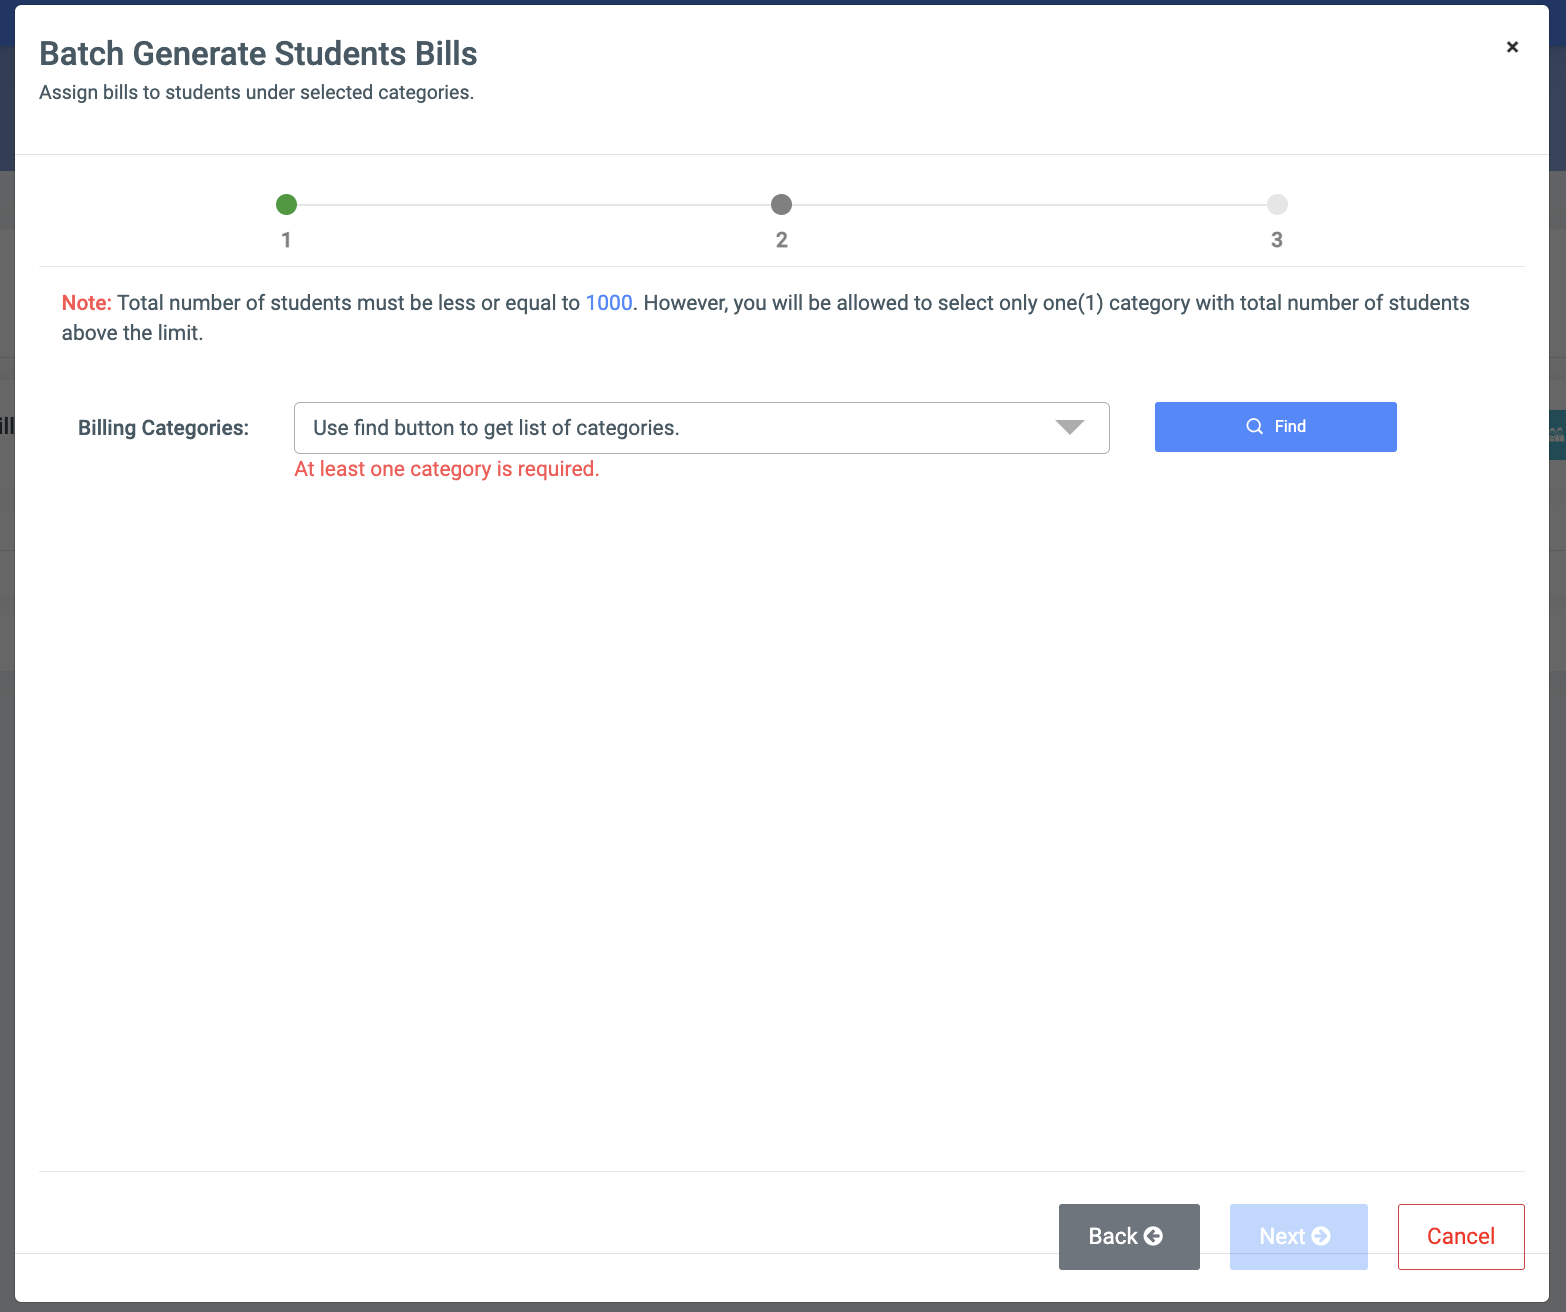
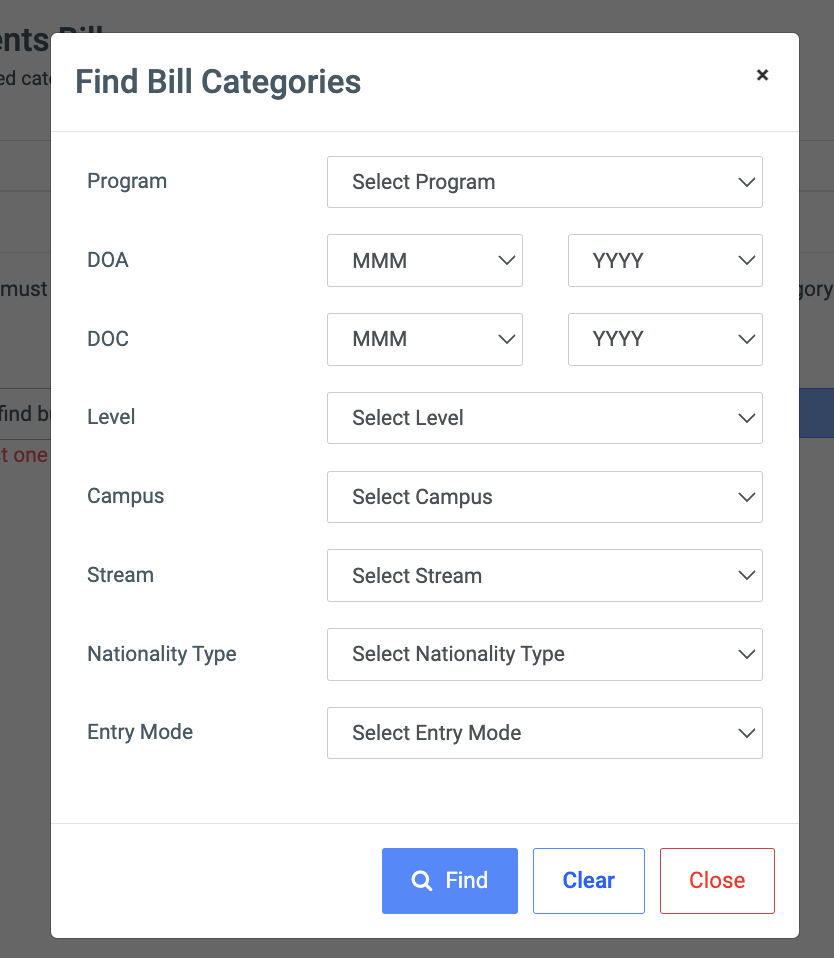
- Bill Categories: In order to find the Bill Category, click on the Find button to open a Find Bill Categories model with the following fields;
- Program: This is a dropdown list showing all programs available in OSIS. It is populated from Manage Programs.
- DOA: This has two dropdowns, MMM for months and YYYY for years. Select the month and year of admission.
- DOC: This has two dropdowns, MMM for months and YYYY for years. Select the month and year of completion.
- Level: Dropdown list of all levels.
- Campus: This is a dropdown of all campuses on OSIS. check Manage Campuses to add programs.
- Stream: This is a dropdown of all streams on OSIS. check Manage Programs to add programs.
- Nationality Type: There are two main types, namely Local and Foreign.
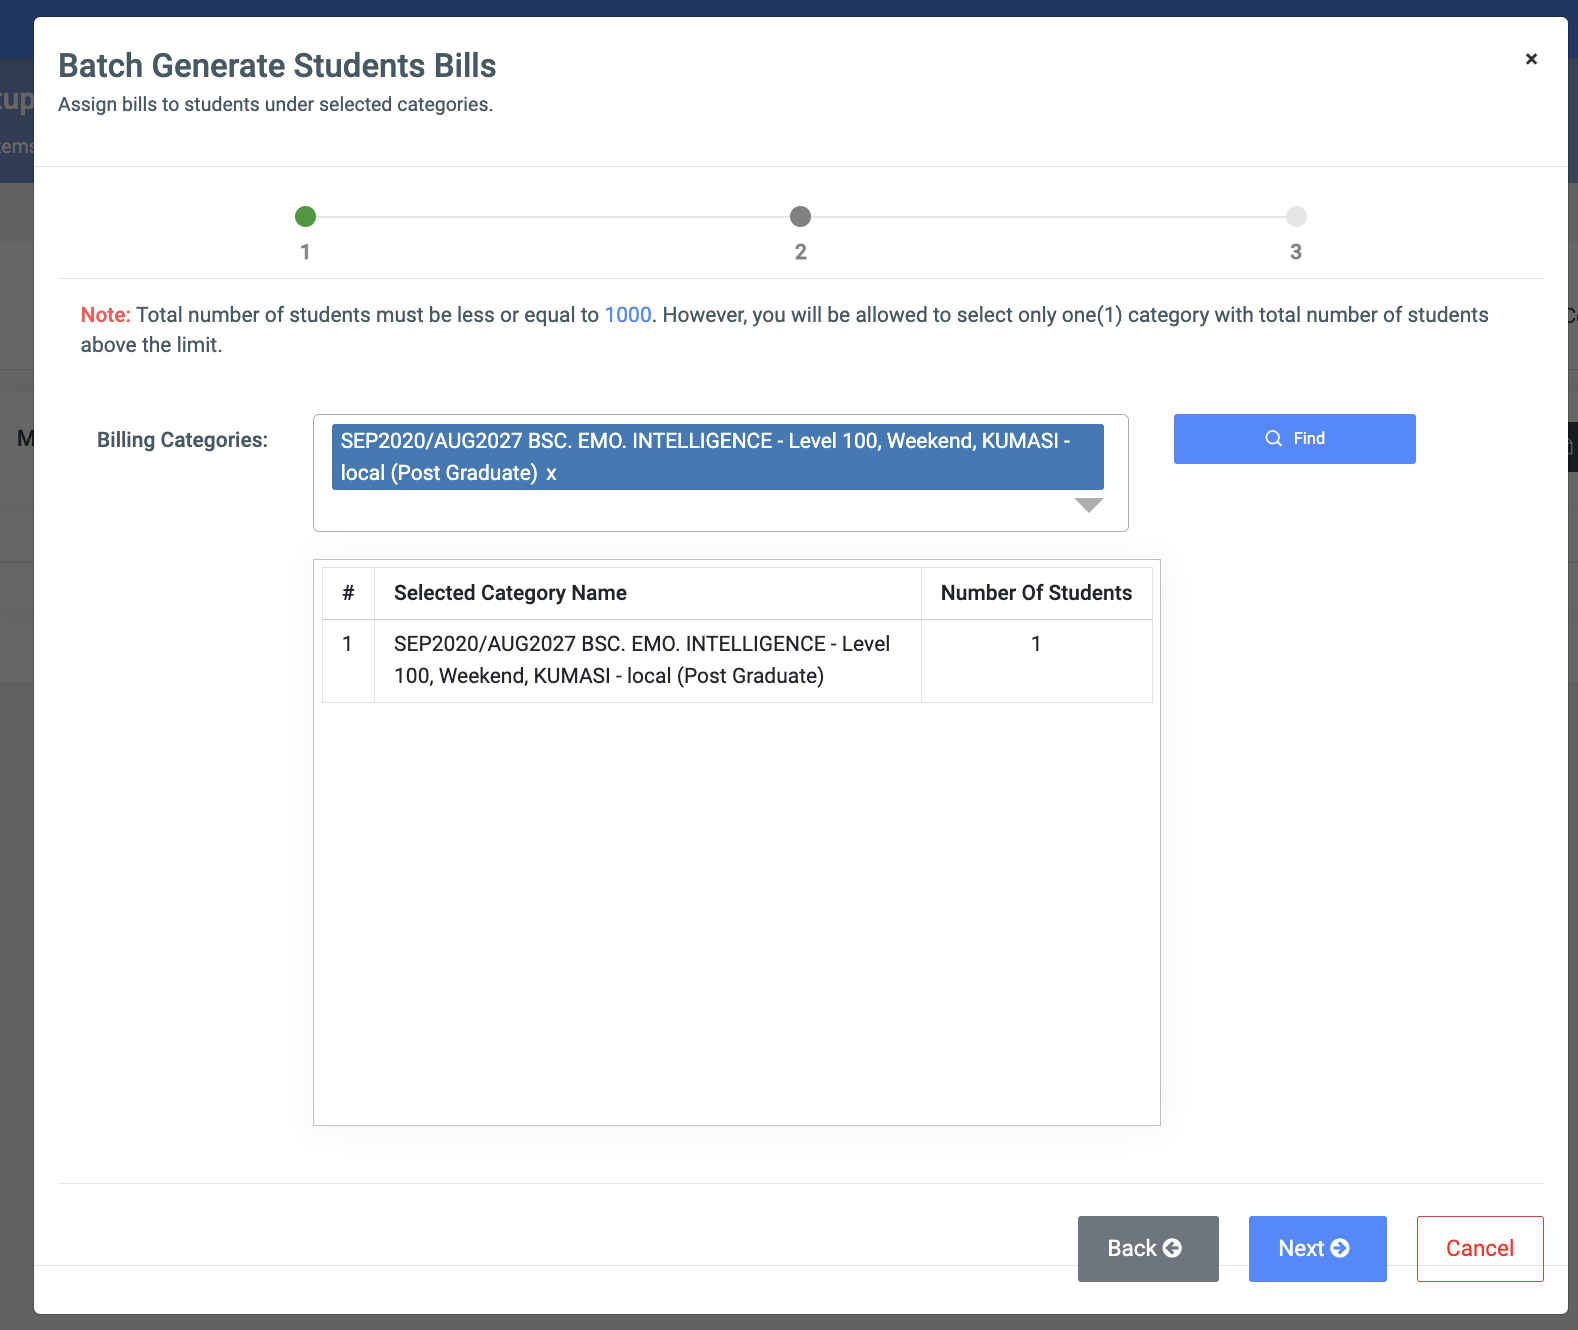
✑ Click on the Next button to move to the next step.
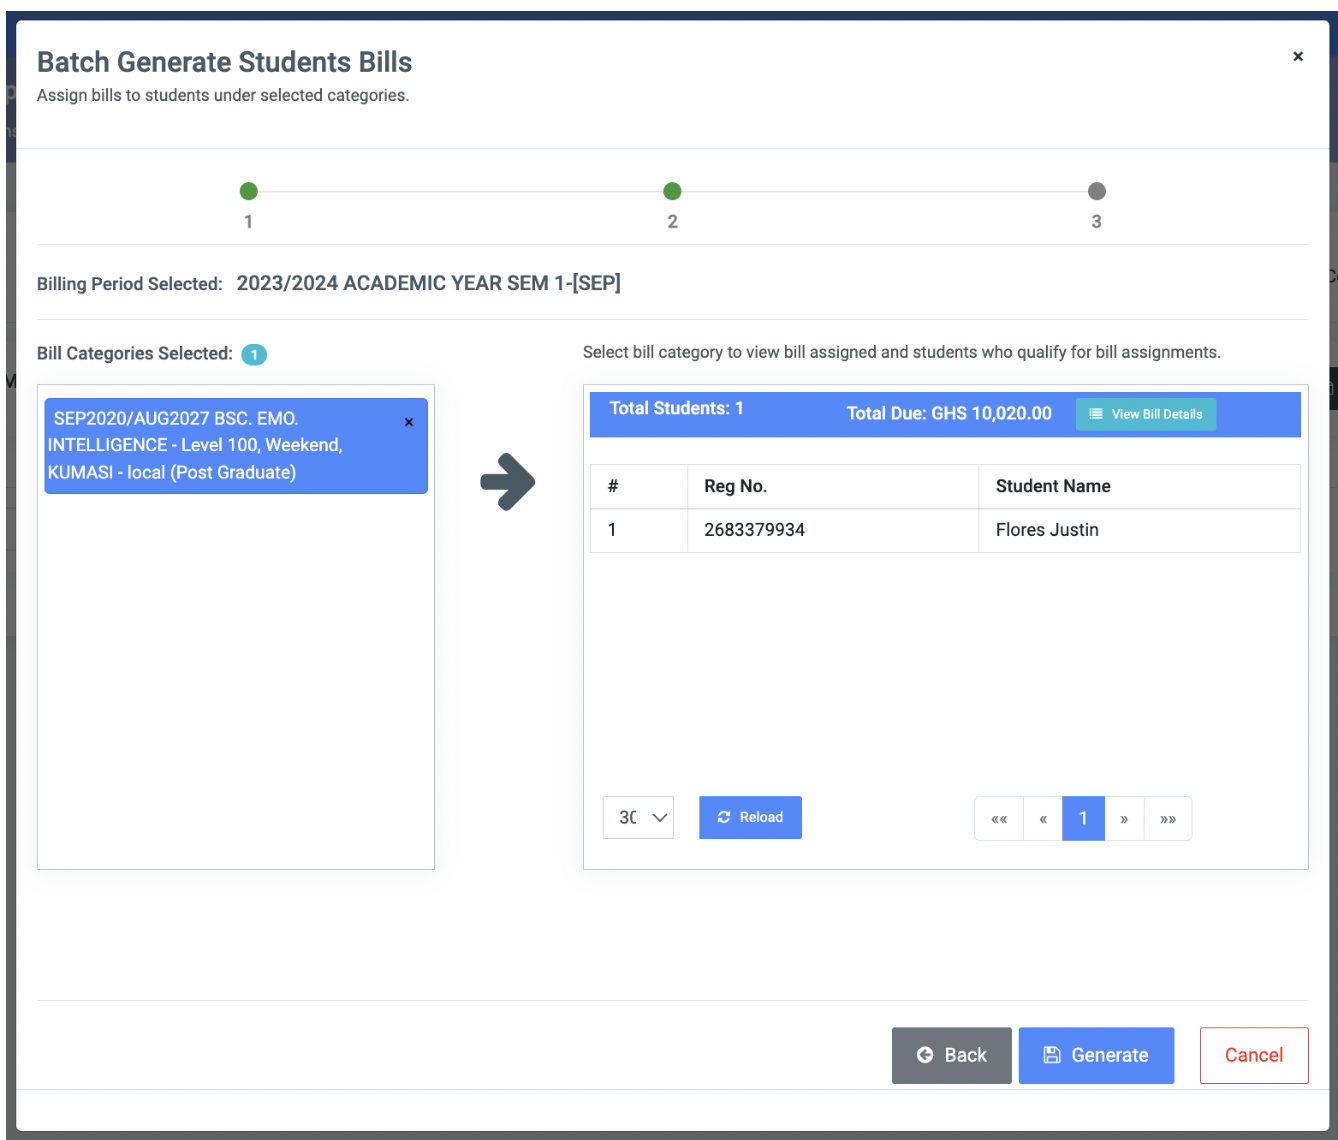
✑ Click on the Generate button to assign bills to the batch.
2. Find button:
✑ Click on the Find to search or assign a bill to individual students. This will open a modal with the following details
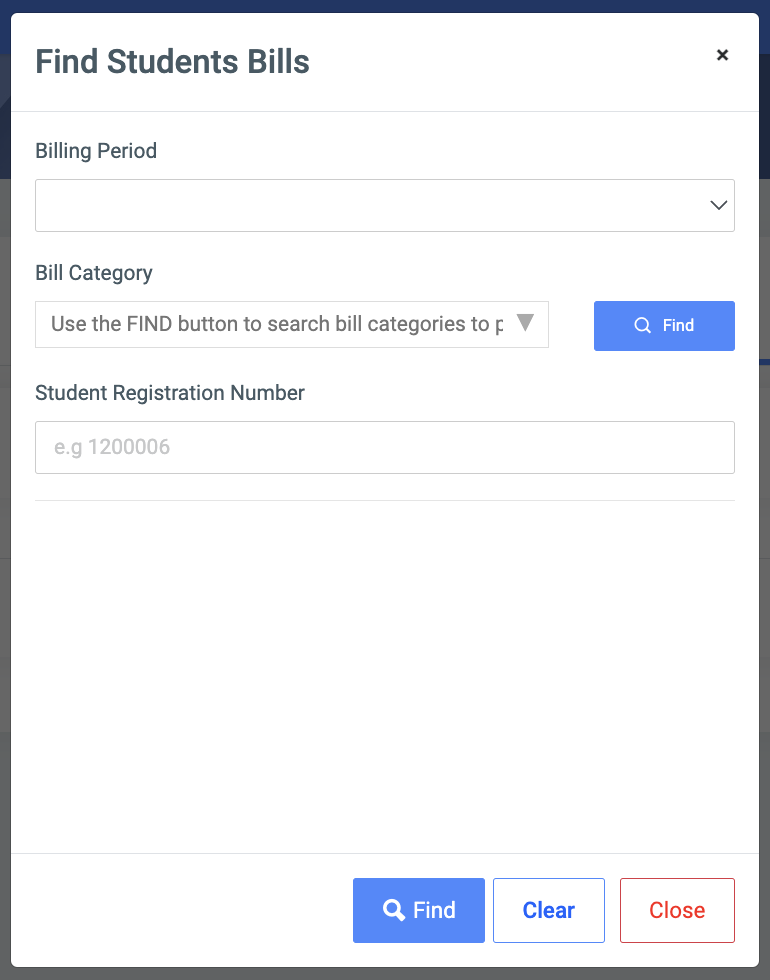
- Billing Period.
- Bill Category: Click the Find button to get all categories.
- Students Registration Number:
✑ Click on the Find button to confirm your actions.
✑ Click on Clear to clear all fields.
✑ Click on Close to close the modal.
For each added Bill, the user can View Bill Details.
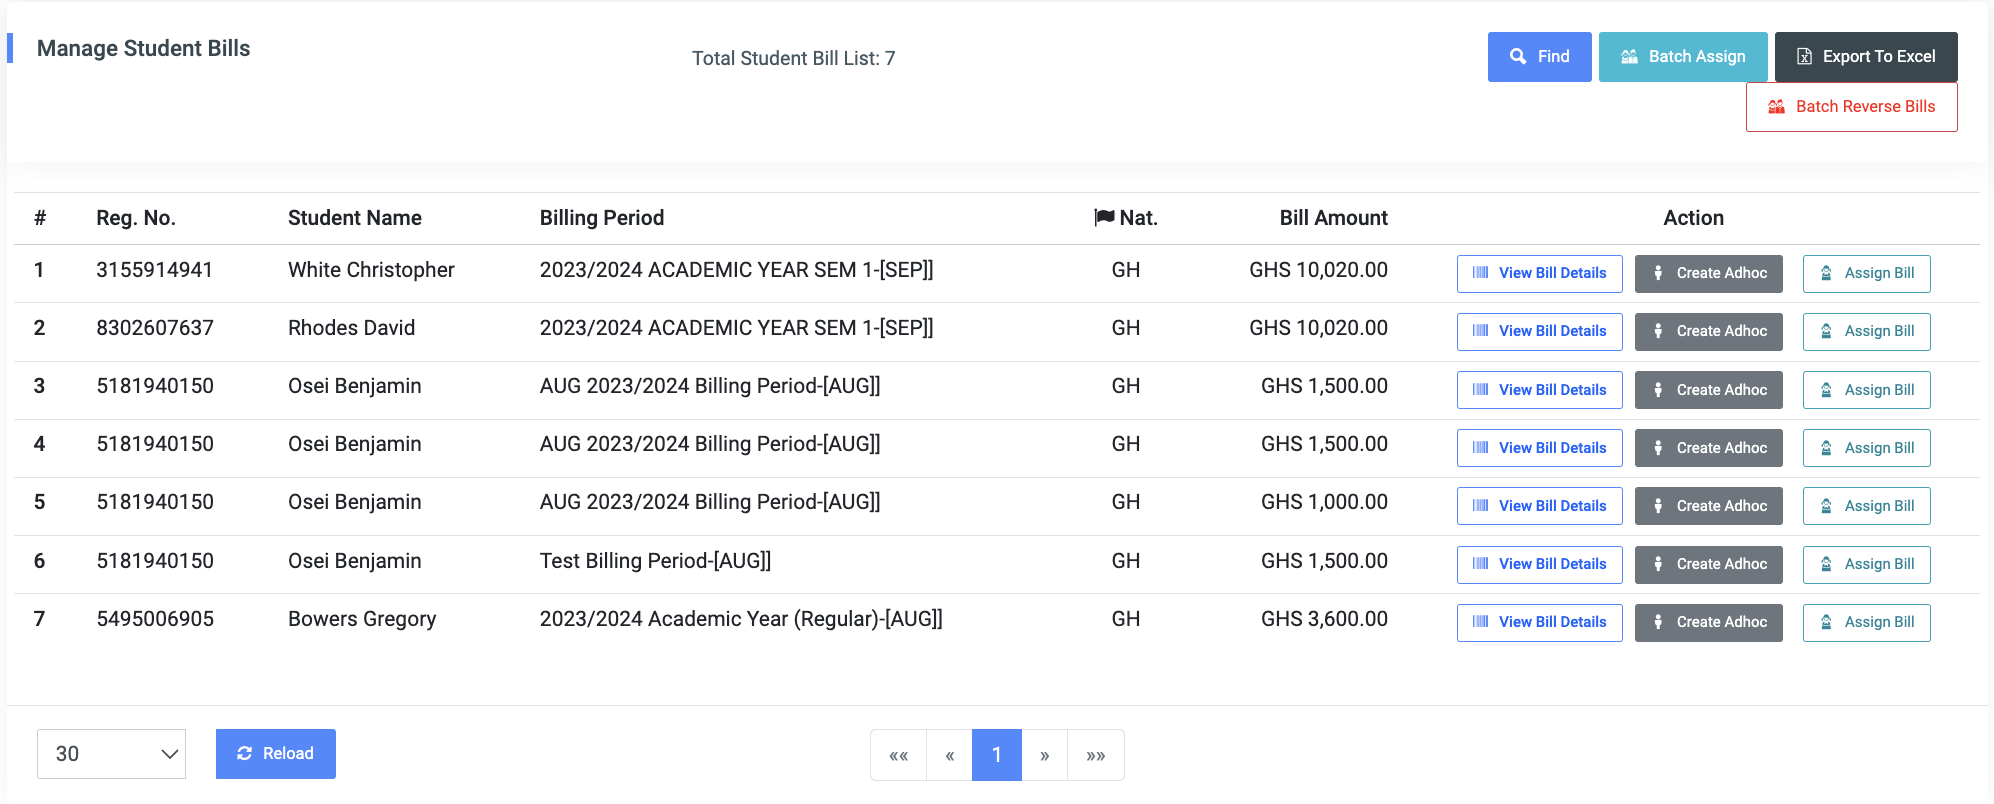
✑ To view bill details of students, click on the View Bill Details button.
✑ Click on the Reload button to refresh the Bills fields.
✑ To create an Adhoc bill for students, click on the Create Adhoc button
Create Ahdoc
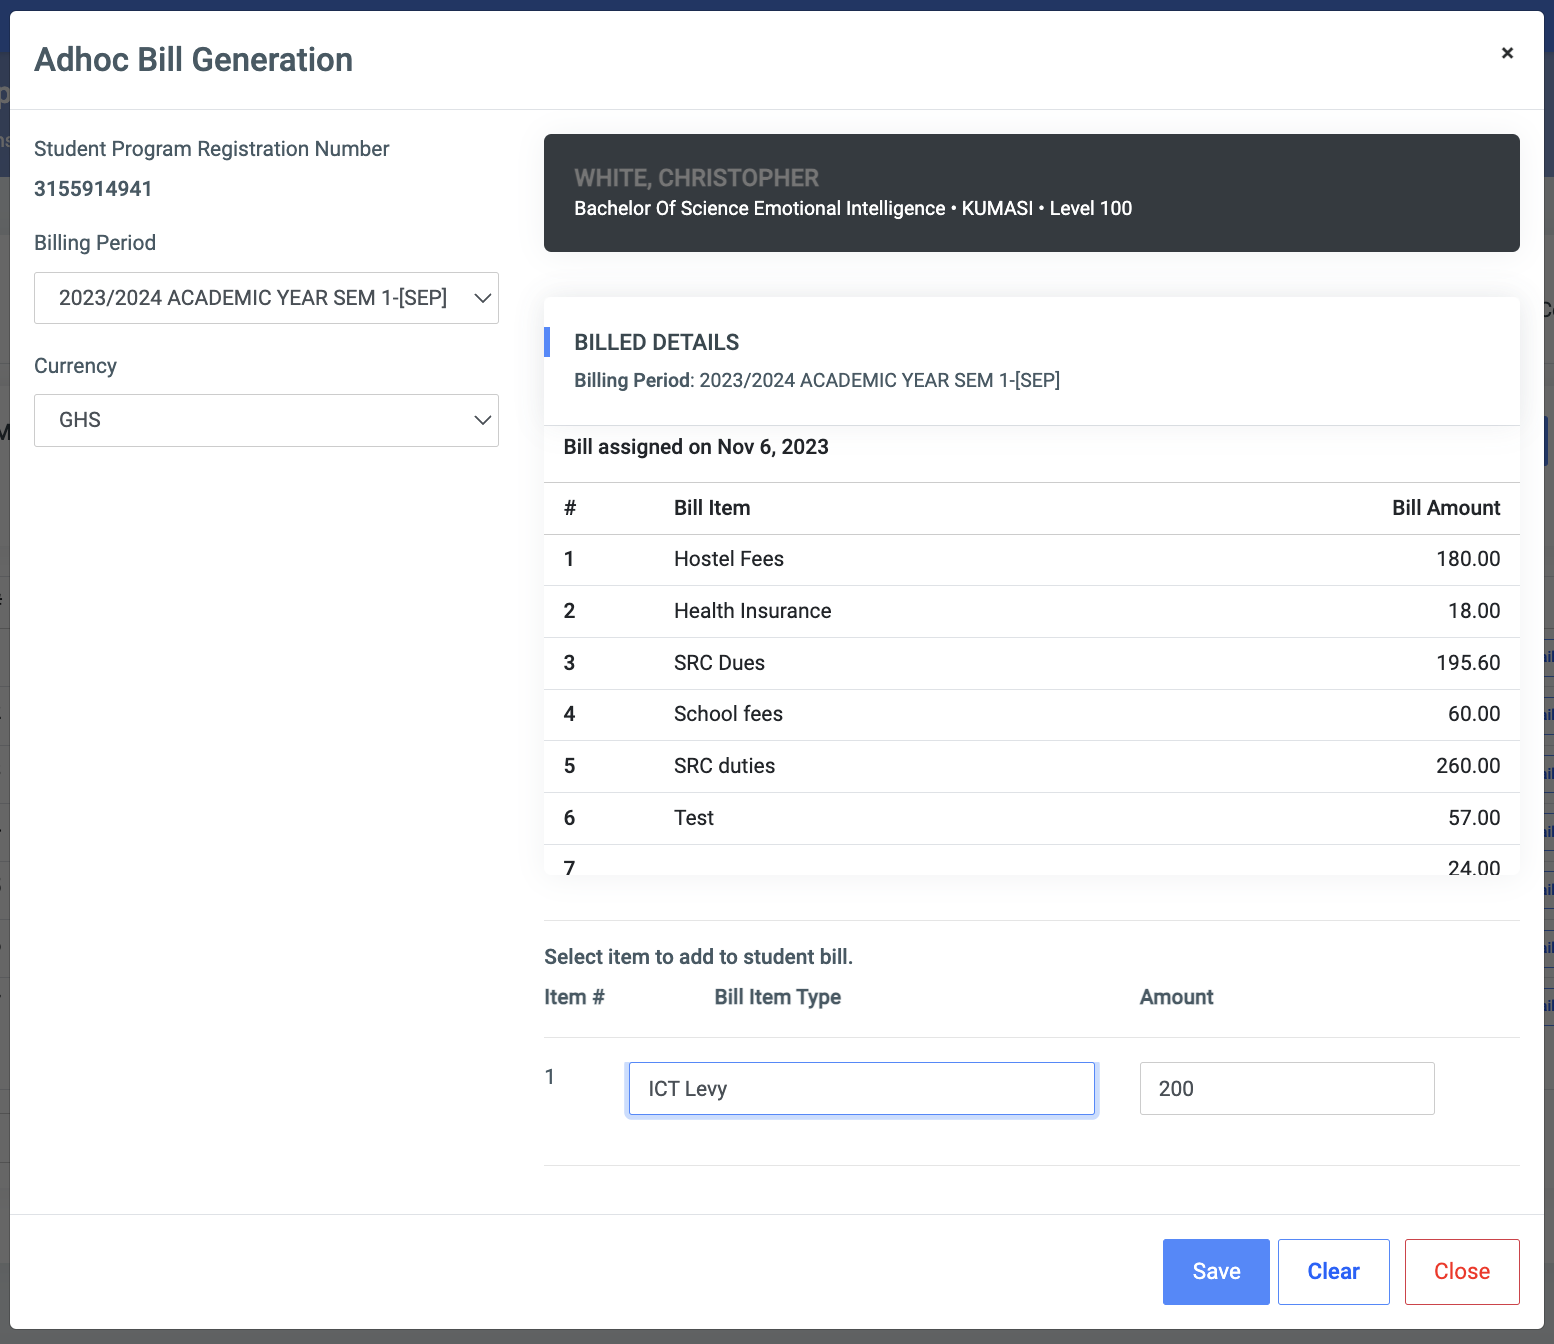
This feature helps to create bills for individual students’ when necessary or needed. It mostly used when the needed bill is not part of the current students’ bill items.
✑ Click on the Create Adhoc  button. This will open a modal with the following details;
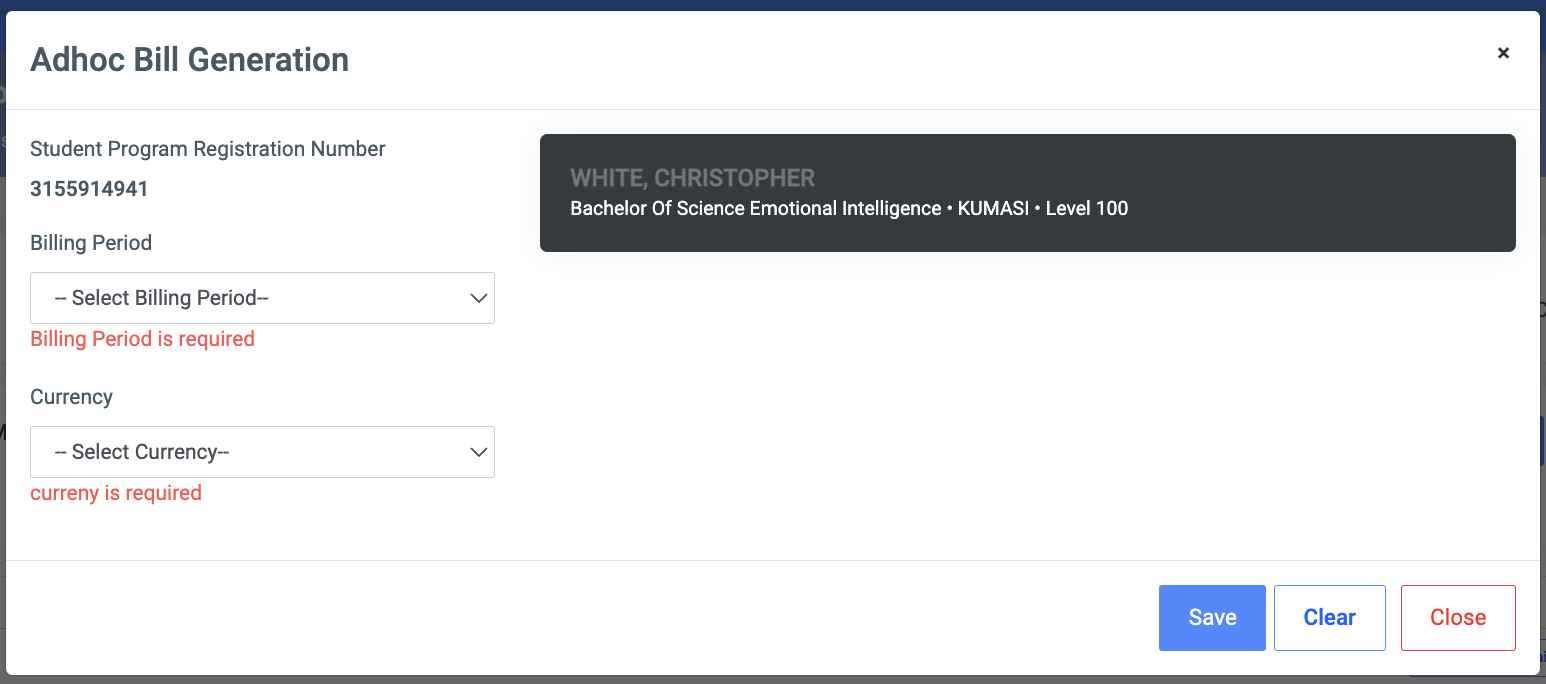
- Student Program Registration Number: The student’s index number will show section. Also, the details of the student will show on the right side of the modal after entry.
- Billing Period: Select the billing period from the dropdown.
NB: This will show extra fields for the user to select the bill item type and enter the amount for that bill. - Currency: Select the currency from the dropdown.
✑ Click on the Save button to confirm your actions.
✑ Click on Clear to clear all fields,
✑ Click on Close to close the modal.
Assign Bill
This feature helps to assign bills to individual students.
✑ Click on the Assign Bill button to assign a bill to a student.
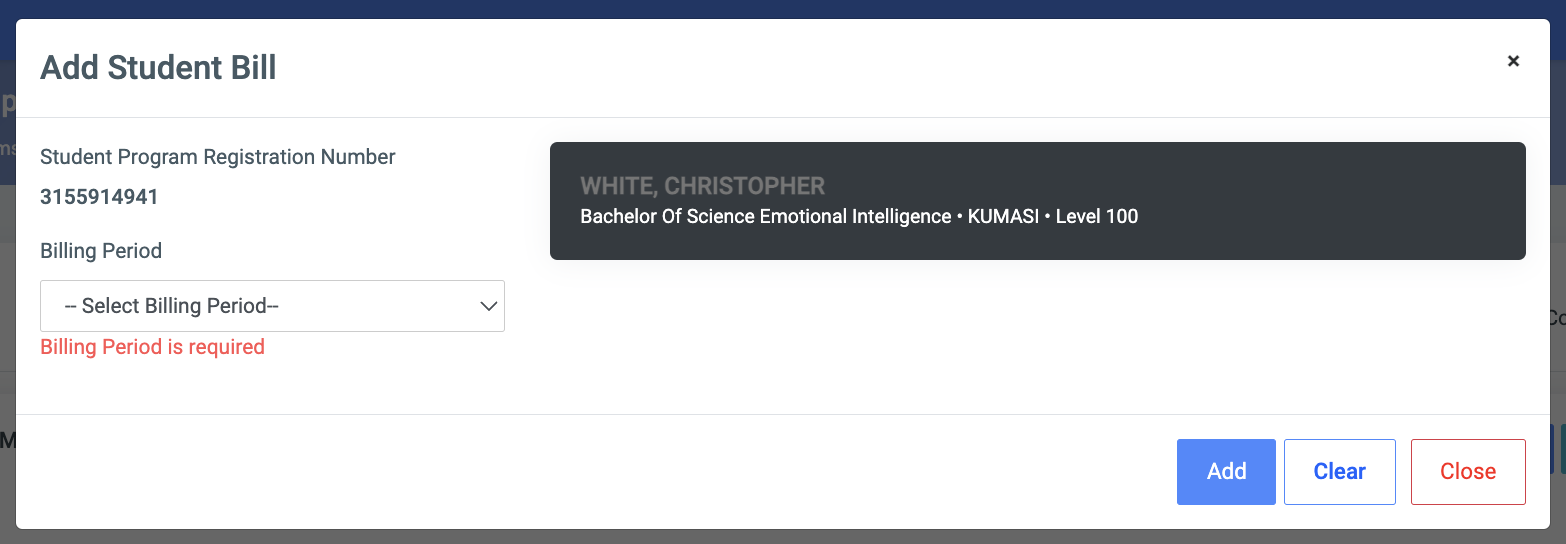
- Student Program Registration Number: Enter the reg number of the student. This will show the details of the student on the right side of the modal after entry.
- Billing Period: Select the billing period from the dropdown.
✑ Click on the Add button to confirm actions,
✑ Click on Clear to clear all fields,
✑ Click on Close to close the modal.
3. Export to Excel:
Click on the Export to Excel button to export all results on the Student Bills page to Excel.
4. Batch Reverse Bills:
This feature enables the reversal of wrong bills that may have been assigned to students.
✑ Click on the Batch Reverse Bills button to start the bill reversal process. This will open a modal with the following details.
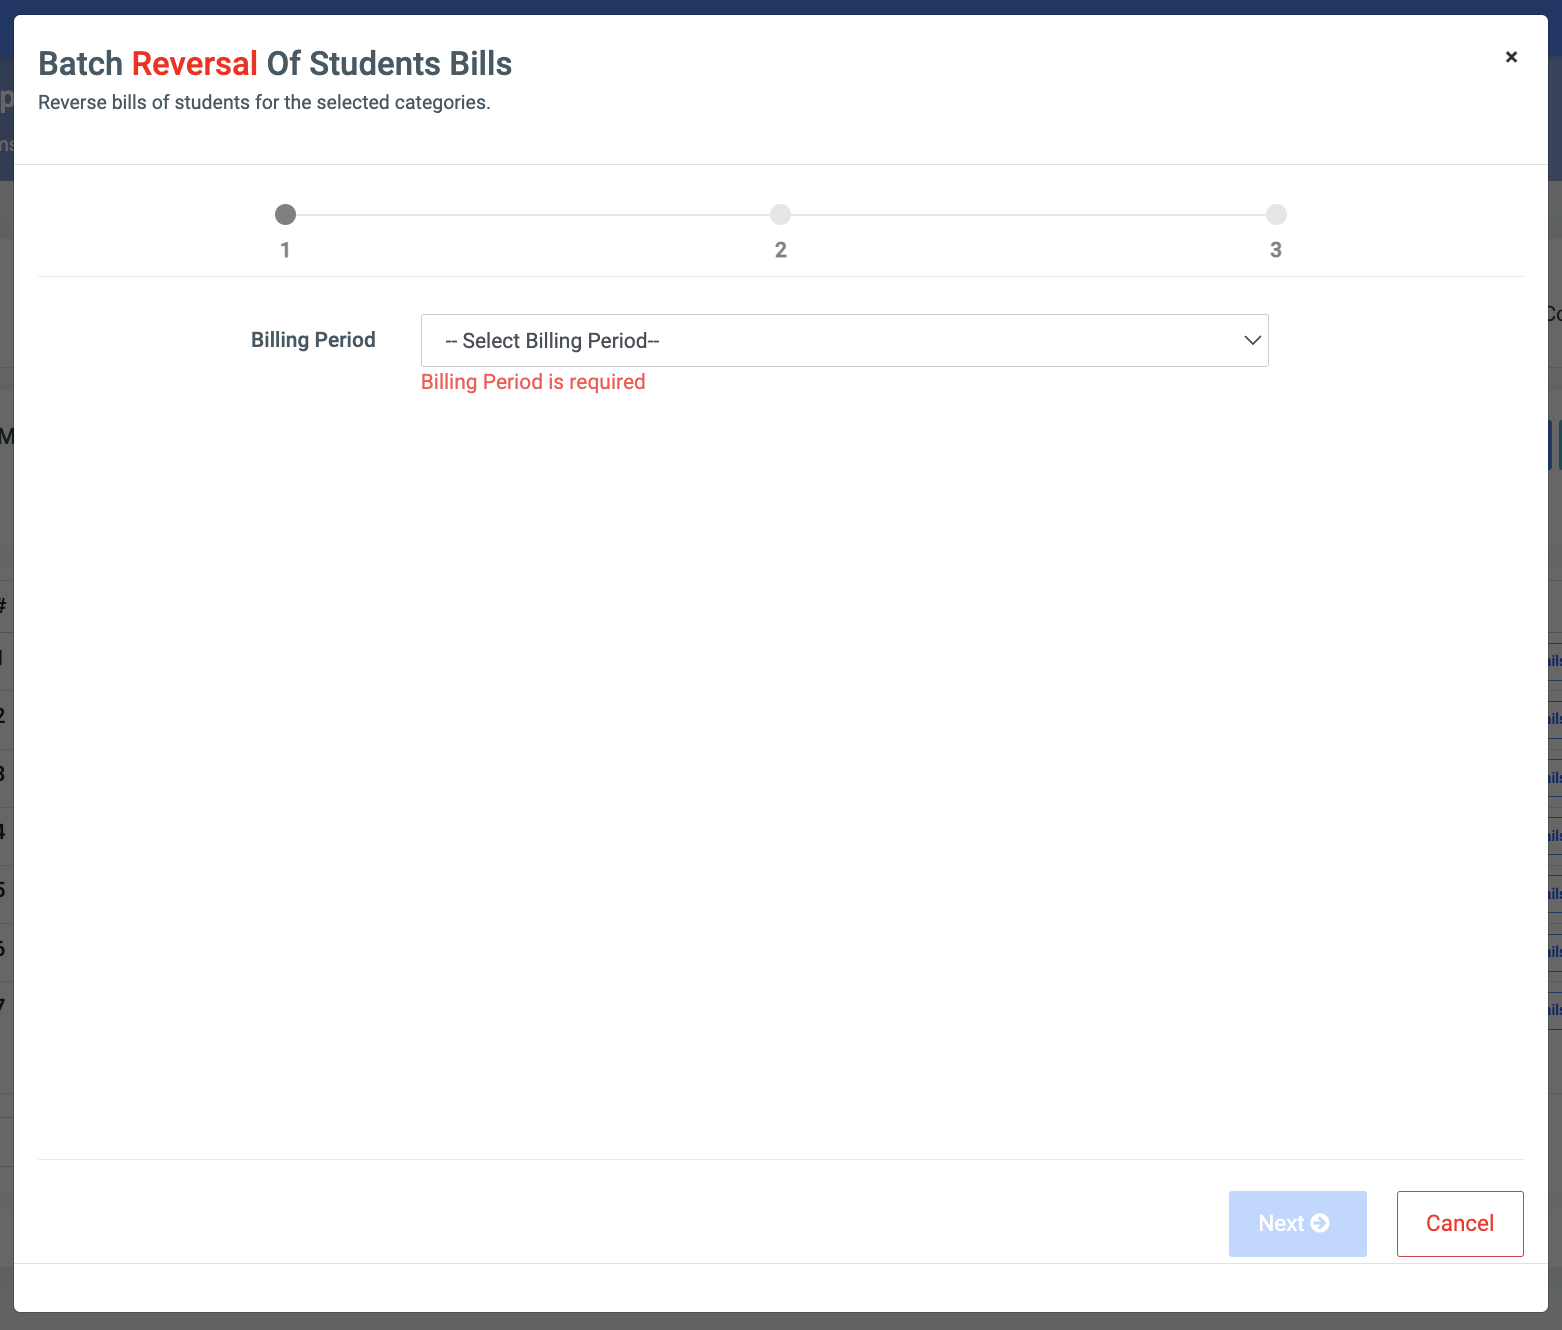
Billing Periods: This is a dropdown list showing details of all billing periods created. Select the billing period and click on Next to proceed.
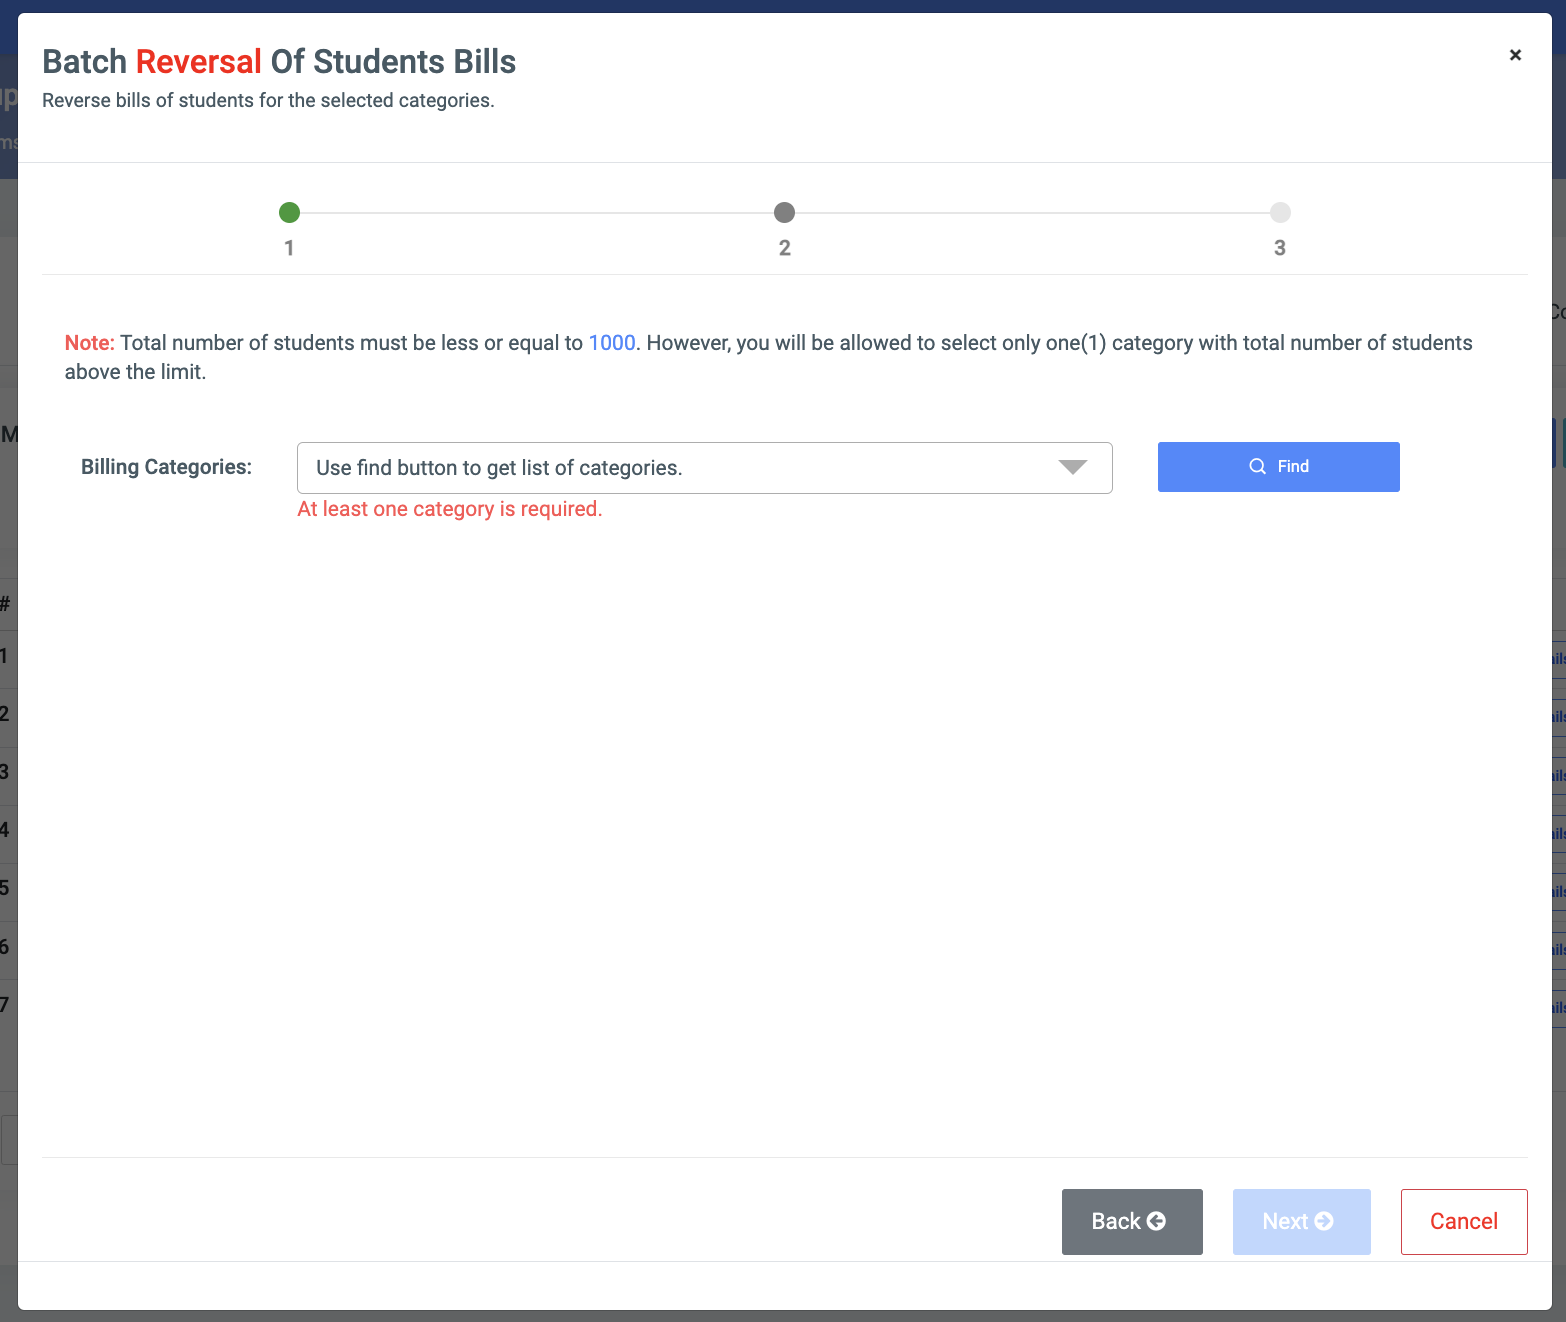
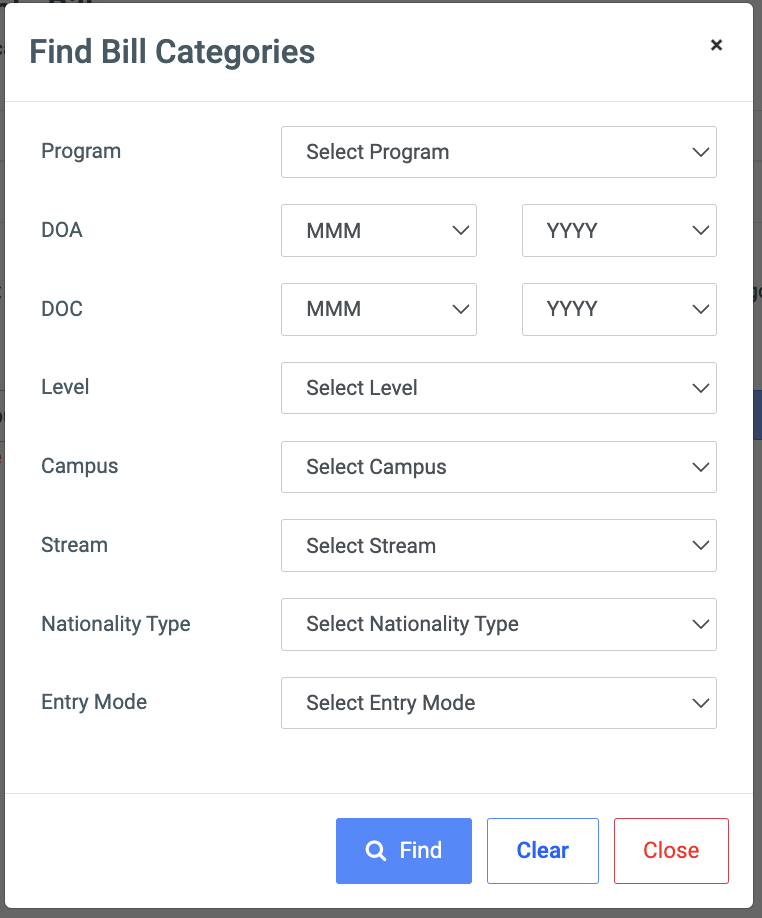
- Bill Categories: In order to find the Bill Category, click on the Find button to open a Find Bill Categories model with the following fields;
- Program: This is a dropdown list showing all programs available in OSIS. It is populated from Manage Programs.
- DOA: This has two dropdowns, MMM for months and YYYY for years. Select the month and year of admission.
- DOC: This has two dropdowns, MMM for months and YYYY for years. Select the month and year of completion.
- Level: Dropdown list of all levels.
- Campus: This is a dropdown of all campuses on OSIS. check Manage Campuses to add programs.
- Stream: This is a dropdown of all streams on OSIS. check Manage Programs to add programs.
- Nationality Type: There are two main types, namely Local and Foreign.
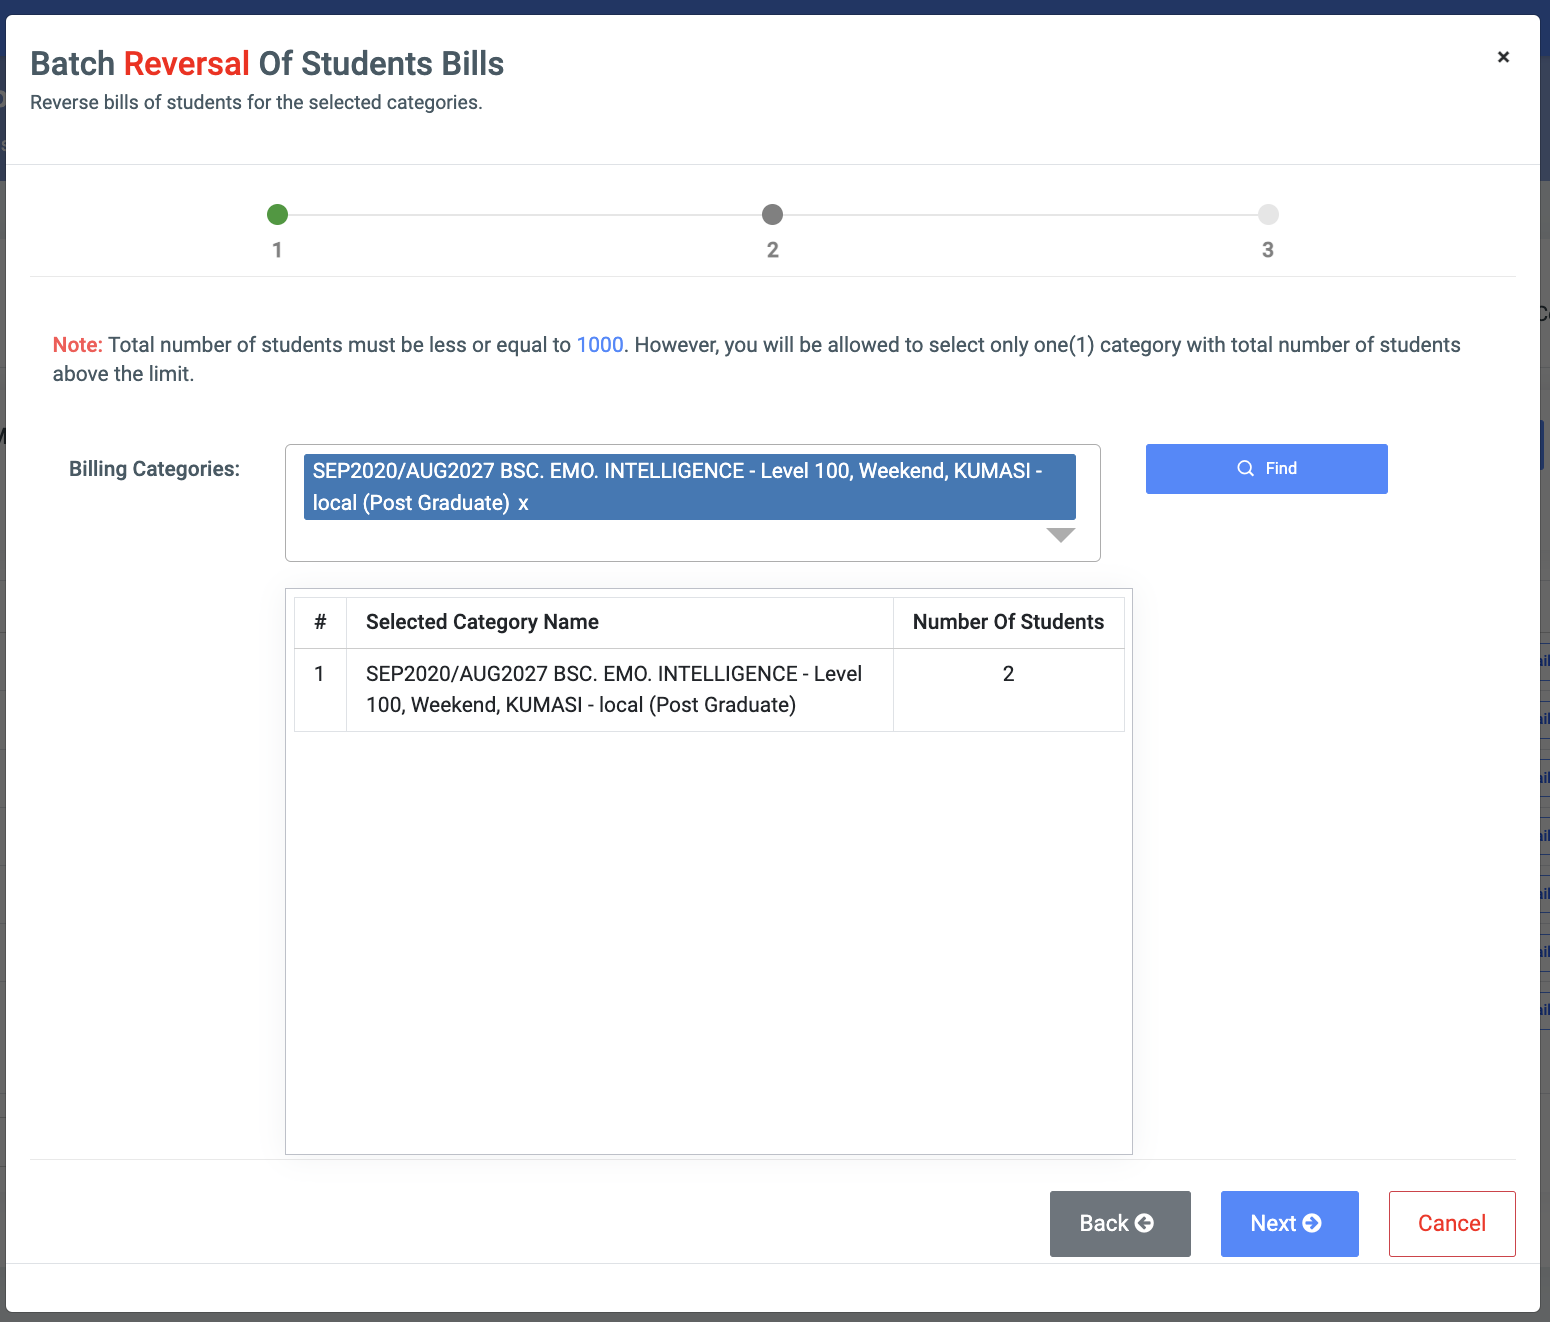
✑ Click on the Next button to move to the next step.
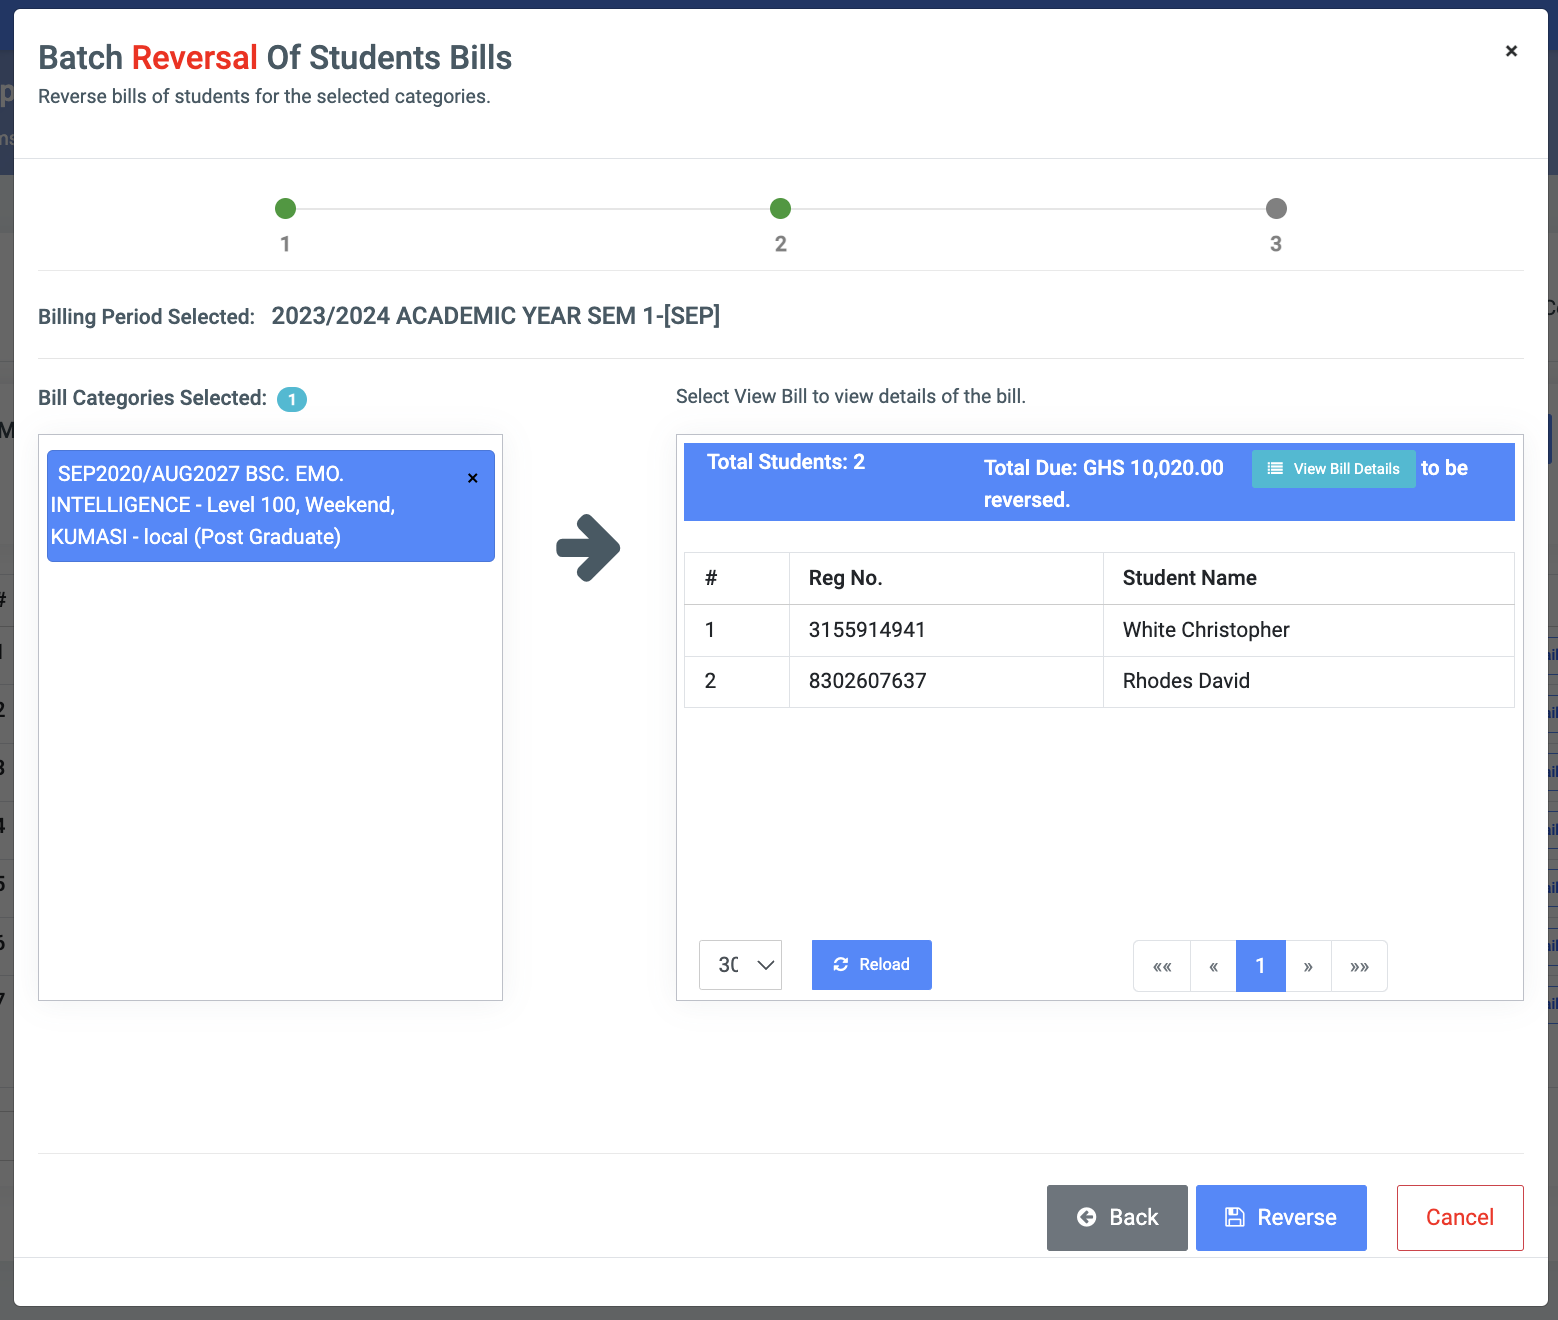
✑ Click on the Reverse button to reverse a bill set for a batch.

